Sunday, January 16, 2011

spinach, artichoke and mushroom quiche-#7 of 52


it's cold and dreary and that's typical of winter. what's not typical is all of the snow we have had lately-just one look at the view from our front door and you can see what i am talking about. before you start snickering and laughing that this isn't enough snow to whine about, think about this-that little bit of snow and the slush and ice it created was enough to keep schools in nashville closed for an entire week. now let's get back to the cold and dreary theme i was working on...meals made of comfort food were the only thing that lightened the mood. way back when, we had a bakery cafe and quiche was often on the menu. darry would make them two at a time and we would generally run out every time. looking back at those days brings a bit of melancholy-oh the stress, the never ending taxes, the drama of employees...how i miss it all (NOT!!!) and yet i do sometimes. the quiet mornings baking breads and breakfast pastries, decorating cookies and wedding cakes. fresh soups and salads and panini sandwiches. and friends-other business owners/employees located in the building as well as some of our own employees. it has been 6+ years and we have all moved on but the quiches still make an appearance on our dining room table. each year on thanksgiving, we host the dinner at our house and our tradition for the morning after is to serve a quiche breakfast for our guests before they start the trip back home. with this in mind, last monday while the snow blanketed the neighborhood, i baked a quiche to brighten the day.

anyone who knows darry, knows his love of mushrooms. we have them growing in the yard on inoculated logs and there are several houses around us with yards where they grow wild. darry picks them whenever he finds them (with permission of course) and we eat mushrooms in all kinds of dishes. for this quiche, i combined baby portabella bella mushrooms with spinach and artichoke hearts. to save some time, use frozen spinach crumbles and while it is still slightly frozen, chop it a little to make it a bit finer in size. if you can find frozen artichoke hearts, use those rather than the ones packed in a jar or can. for one, they will not be marinated or brined and will taste more like a fresh artichoke. the other plus is that your quiche will not be dominated by the flavor of a brine or marinade.
spinach, artichoke and mushroom quiche
yields 1 (10") quiche serving 8-10

to make the best and easiest quiche to serve, use a quiche dish. they tend to be shallower than a pie dish and a little larger. i found my 10" corning ware quiche dish in the thrift store for $2.99!

pie dough-use your favorite recipe or purchase some and make a pie shell. this filling recipe will work in a deep (9") pie shell as well but make sure it is one of the really deep ones such as a pyrex deep glass dish found in most supermarkets and stores. once the pie dough is lining the dish, you will need to prebake it. place parchment, foil or coffee filters into the pie shell, fill it with dried beans or weights and prebake it at 325 until it is no longer shiny on the bottom but is not yet coloring at the edges probably about 18-20 minutes. for more hints on this, see my previous post.

2-3 tablespoons olive oil
3/4 cup diced onion, about 1/2 of a large onion
1 clove garlic, minced
8 ounces baby portobella mushrooms, sliced
1-2 tablespoons dry white wine
2 cups frozen spinach crumbles
2 cups frozen artichoke hearts
1 1/4 teaspoon kosher salt
1/4 -1/2 teaspoon freshly ground black pepper
pinch of freshly grated nutmeg
2 cups good quality grated swiss cheese-gruyere, jarlsberg or other favorite
1/2 cup freshly grated hard cheese such as parmesan, asiago or romano
8 eggs
2 cups heavy cream

in a large saute pan, heat the olive oil and saute the onions. when they are beginning to look translucent, about 3 minutes, add the garlic. saute the garlic while stirring frequently for a minute. add the mushrooms and the herbs de provence. after the mushrooms are heated through and are beginning to sizzle a little, add the wine and cover the pan to force them to release their juices. after a minute or two, remove the cover and stir to prevent sticking. add the spinach and the artichokes as well as the salt, pepper and nutmeg and stir to combine. reduce the heat a bit, cover the pan and cook to thaw the spinach and artichokes. after a few minutes, remove the lid and continue sauteing the vegetables to prevent sticking and to dry out the water that is being released by the frozen ingredients-a crucial step to a good quiche since watery vegetables will make a loose quiche that will not set properly. when the water has been dried out enough, the vegetables will begin to stick to the bottom of the pan. remove the pan from the heat and allow the mixture to cool in the pan. at this point, you will be able to see if you have cooked it enough; as it sits, liquid will pool at the bottom if it was not dried out sufficiently and you can return it to the stove if necessary. preheat the oven to 350. once cooled, spread the mixture evenly over the bottom of the crust. sprinkle the cheeses evenly over the vegetables. in a small bowl, whisk the eggs to combine them and then whisk in the eggs. only mix to incorporate, try not to add lots of air or you will have bubbles in the custard and the results will be a less creamy quiche. place the quiche dish on a sturdy baking tray and slowly pour the custard over the filling. allow the quiche to sit for a minute or two so the custard can become distributed evenly throughout the filling leaving. bake until the quiche is firm around the edges and the center is not jiggly, about an hour for a shallow 10" quiche dish. allow the quiche to sit for 10-15 minutes before cutting and serving.

any of you adventurous sorts out there that want to try this at home, please do and then send me a picture(bakinbabe116@aol.com) and i will post it here, a round up if you will for anyone who dares...

Saturday, January 8, 2011

lime margarita pie, #6 of 52


nothing brightens your mood like a sunny day in the middle of winter. a tart citrus pie is just what you need to bring a little of that sunshine to your palate and chase the doldrums away. a little tequila wouldn't hurt either... i found myself with a bag of limes that had been forgotten in the fridge. a quick trip to the corner liquor store and i had a small bottle of silver tequila to go with the triple sec lurking in the cupboard. after pondering the plan for a day, i decided to make this a no bake pie; the filling is a mousse.

first i made a lime curd base with a little added lemon juice. it seems that limes are more bitter than sour and i wanted this to be a little on the tart side. i did a little research and discovered an article on art of drink all about margaritas and what the taste balance of one should be, it was very informative and it can be found here. as i let the base cool, i got to work on the crust.

for a margarita to be balanced in flavor, it must have some salt. what better to bring salt to a pie than a bag of pretzels? we live on pretzels here and there is always at least one bag in the closet. for this recipe, i chose the classic thin twists simply because they had the most salt on them. after grinding them, mixing them with sugar and melted butter, i pressed the mixture into a glass pie plate and moved on to the mousse.

for mousse to be mousse, it requires adding whipped ingredients-whipped cream and egg whites. since i was using my hand mixer, i whipped the whites first and then the cream so i would not have to wash the beaters. yes folks, i can say it, i'm a lazy baker...the whites were whipped with sugar to them to keep them from becoming sudsy and dry which will also make folding them in a little easier. be sure you do not whip them as stiff as they will go-let them droop a little like in the photo. the cream needs to be whipped until stiff but not so stiff that it is almost butter-you want that to be a little soft too or it could break during the folding process. since there is gelatin involved, pour the mousse into the pie shell and let it set in the fridge for a few hours or it will be too loose to cut into pretty slices. garnish with additional whipped cream and pretzels if you wish.

lime margarita mousse pie with pretzel crust-serves 8-10

zest of one lime
4 ounces fresh squeezed lime juice-about 6-8 persian limes (regular green ones)
2 ounces fresh squeezed lemon juice-about 2 lemons
1/2 cup sugar
6 egg yolks (use large eggs and save the whites)
2 tablespoons cornstarch
2 ounces tequila, preferably silver (clear, colorless)
1 ounce triple sec or curacao
1 package gelatin
3 cups pretzel twists
3 tablespoons sugar
5 tablespoons unsalted butter, melted
4 egg whites
3 tablespoons sugar
1 cup heavy cream

zest the lime, set this aside. juice the limes and lemons. measure the juice and place it in a non reactive sauce pot with the 1/2 cup sugar; set it over medium heat. stir occasionally to dissolve the sugar. pour the tequila and triple sec into a microwavable cup and sprinkle the gelatin over the top to soften it. in a heat proof bowl, whisk the egg yolks with the cornstarch until no lumps remain. when the juice comes to a slow boil, pour it into the egg yolks while whisking them. pour this mixture back into the sauce pot and over medium low heat, return to a slow boil while whisking continuously. allow to boil gently for 1 minute and immediately pour through a strainer into a heat proof bowl (use a clean one, never mix raw and cooked eggs!). stir in the zest. heat the gelatin in the microwave on low or defrost for about 20 seconds to liquefy it. pour the gelatin into the lime curd and whisk until smooth. press plastic wrap over the surface and leave it at room temperature to cool. it should be cool to the touch with no trace of heat-this also prevents the gelatin from setting hard at this point.

to make the pretzel crumb crust, grind the pretzels in a food processor until fine, this should yield 1 cup of crumbs; be sure to measure the crumbs-1 full cup is needed. mix the crumbs with the sugar and butter and toss to combine. press the mixture to the sides and bottom of a 9" pie plate. set aside until the mousse is complete.

in a mixing bowl on high, whip the egg whites until foamy. add the sugar and whip until almost completely stiff but they still droop slightly when the beater is raised. set the whites aside and in a separate bowl, whip the cream until almost stiff as well. when the base is completely cooled, pour it into a large but shallow mixing bowl. fold in the whites and then fold in the whipped cream and only fold until combined with no streaks visible. scrape the mixture into the prepared pie shell and cover with plastic. refrigerate for several hours to set the gelatin.

to serve, use a knife dipped in hot water to slice and be sure to clean it after each cut. pie can be garnished with additional whipped cream and pretzels if desired. to anyone that cares to bake along, send me photos and i will post them. email me at bakinbabe116@aol.com and your photos will be added to the next entry.


Sunday, January 2, 2011

ringing in the new year with a chocolate mousse pie, #5 of 52

this last week has been a bit of a blur. time flew and before i knew it, it was new year's day. we have had a bunch of rain-something not in short supply here and the weather has made it a bit gloomy. darry decided to make a nice dinner for the girls and me to celebrate the new year. for dessert, i made a chocolate mousse pie in a coconut crust with a drunken banana caramel sauce. just what we needed to warm up the cold and gloomy day.

chocolate mousse pie in a coconut crust with a drunken banana caramel sauce-serves 10

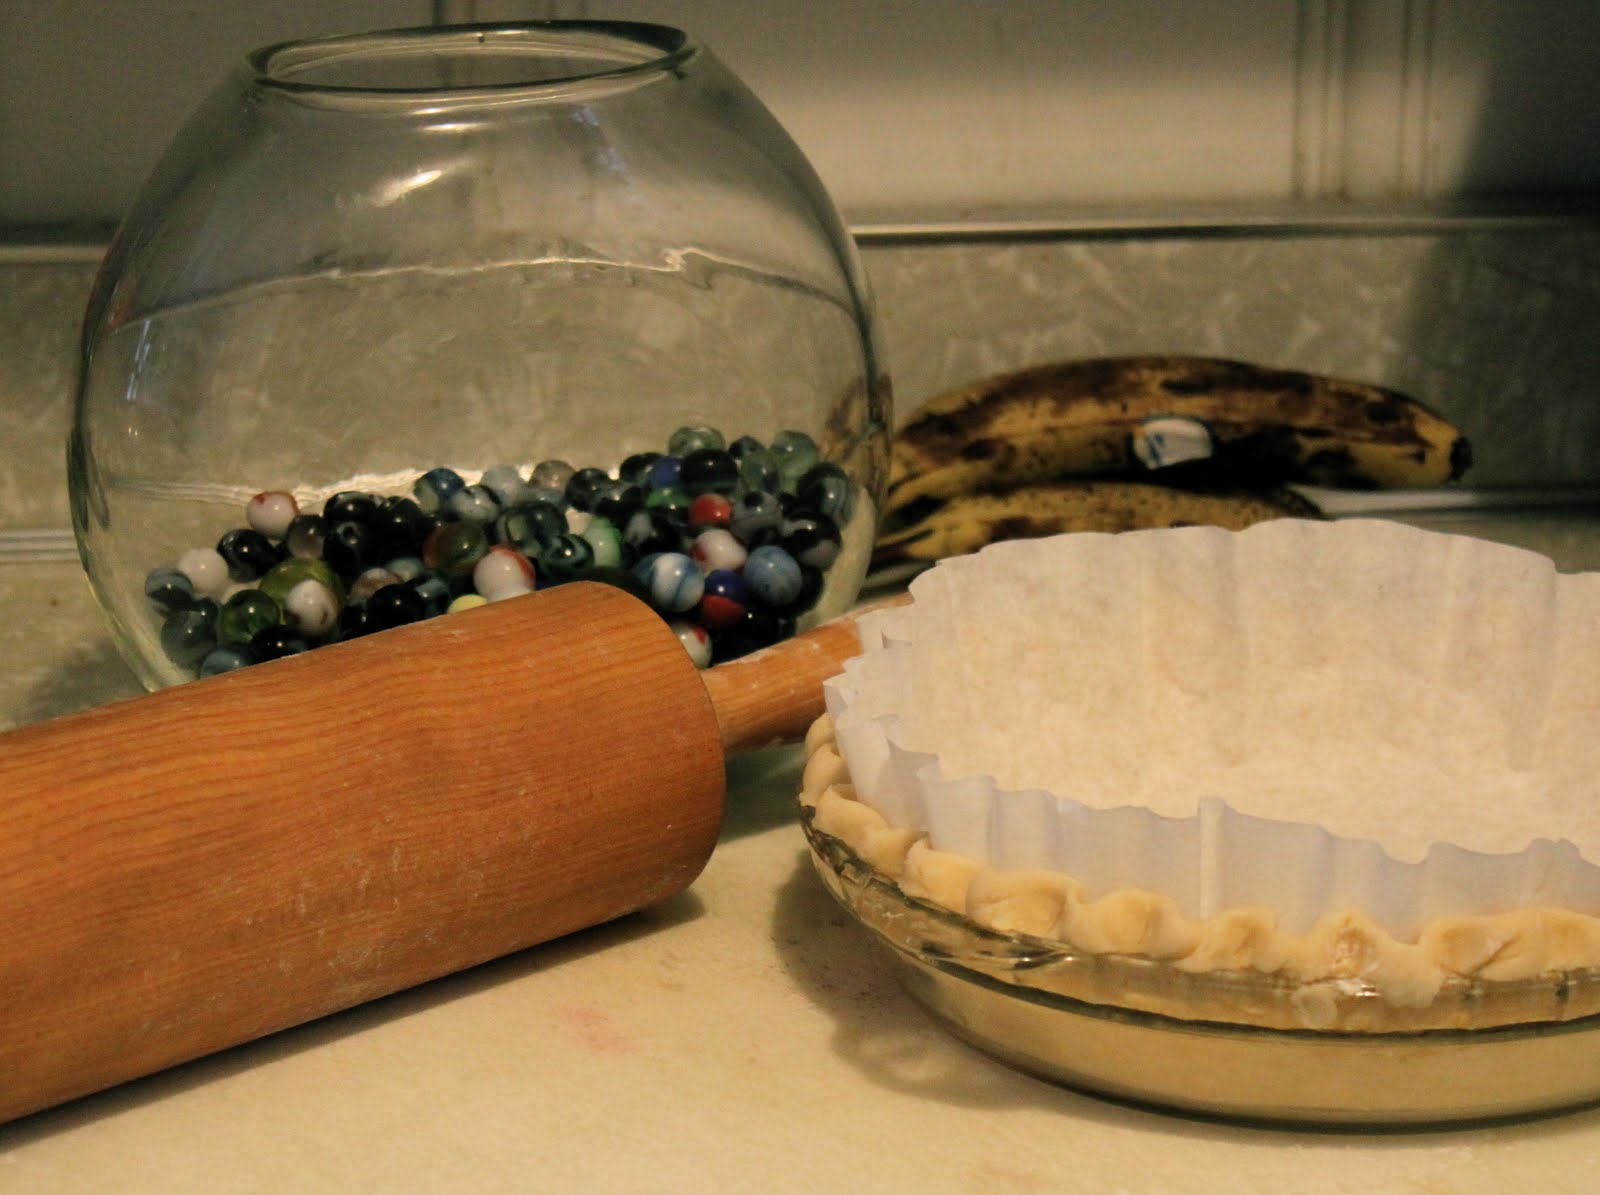
as always, i pulled out the biggin-my favorite rolling pin and i found my marbles. the dough was made in the food processor, pressed into a thick disk and chilled for a few hours. when it was time to roll it out, i let it come to room temp and lined a glass pie dish-this one is a big pyrex dish and it is deeper than most. the crust is allowed to rest in the fridge for an hour to minimize shrinkage when baked. the crust must be completely baked since the pie filling is a mousse and will not be baked.

coconut crust-1 (9-10 inch) pie crust
1 cup all purpose flour
1/4 cup powdered sugar
1 teaspoon baking powder
1/4 teaspoon salt
6 tablespoons unsalted butter, cold and cut into small cubes
3-4 tablespoons coconut milk (unsweetened)
place the flour, powdered sugar, baking powder and salt into the bowl of a food processor. pulse a few times to combine. sprinkle the butter cubes over the mixture and pulse until it resembles coarse meal. add 3 tablespoons of coconut milk and pulse until the mixture comes together and forms a soft dough-only add the extra tablespoon of coconut milk if it seems dry and does not come together. form the dough into a disk and chill it for a few hours or overnight. can also be made in advance and frozen for up to a month. allow the dough to come to room temp before rolling out

preheat the oven to 350. roll out the crust, carefully transfer to a pie plate and flute the edges if desired. line the crust with coffee filters or parchment paper and fill with weights. bake until lightly browned around the edges and the bottom (on the inside of the shell) is no longer shiny. remove the weights and prick the bottom a few times, return to the oven and allow the bottom to bake a little longer.

chocolate mousse pie filling
to make the mousse filling, plan on at least 2 hours. the base for the filling must cool before the whipped cream can be added. it is possible to make the filling base and while it cools, tackle the task of rolling and baking the crust.


2 tablespoons dark rum
1 package unflavored gelatin
4 egg yolks
2 tablespoons cornstarch
2 cups half and half
1 cup+ 2 tablespoons sugar
3 ounces unsweetened chocolate
2 cups heavy cream
have a heat proof bowl with a mesh strainer over it handy-you will need it for the custard. place the rum in a microwavable dish and sprinkle the gelatin over it, set aside. place the egg yolks and cornstarch in a heat proof bowl and add a small amount of half and half. whisk until all of the cornstarch is dissolved. pour the remaining half and half and 1 cup of the sugar into a sauce pot. place over medium heat and stir to dissolve the sugar. bring to a gentle boil and temper the yolks by pouring a small amount of the hot half and half into the yolks while you whisk them-you must whisk them or you will scramble them. continue whisking the mixture as you pour half of the hot mixture into the yolks. place the remaining hot half and half back onto the stove at medium heat and begin whisking the milk. while you whisk the half and half, pour the tempered yolks into the pot. continue whisking the custard in the pot until it comes to a boil. allow it to boil gently for a minute to cook the starch. place the gelatin mixture in the microwave and on the lowest setting, heat the mixture to bring it to a liquid state in 10-15 second intervals. add the chocolate to the hot custard and whisk until it is melted. add the liquid gelatin and stir to combine. pour the custard base through the strainer into the heat proof dish. press plastic wrap to the surface(to prevent a skin from forming) and place in the fridge. do not allow the mixture to get completely chilled or the gelatin will set, you just want it to get cooled enough to add the whipped cream without melting it. it will take a while and you may have to stir it to keep it from setting around the edges.

when the custard base has cooled, beat 1 cup of heavy cream until almost stiff and gently fold it into the base. place the base into the cooled pie crust and smooth out the top. beat the remaining cup of heavy cream with the 2 tablespoons of sugar until stiff and spread over the chocolate mousse in the pie dish. chill the pie while you make the drunken banana caramel sauce.

drunken banana caramel sauce, makes about 1-1/4 cups

use a ripe banana for the most flavor-one that is nice and spotted and very fragrant. caramel is one of those recipes that requires attention-do not walk away or allow yourself to become distracted while the sugar cooks or you could end up with lots of smoke and a burned pot to clean!


1/4 cup banana puree-use a blender, food processor or a food mill to get a smooth puree
1/4 cup half and half
1 tablespoon unsalted butter
1" piece of a vanilla bean pod (use a piece that has been scraped out if you have it)
1 cinnamon stick
1 cup sugar
1/4 cup water
2 tablespoons corn syrup
2 tablespoons dark rum
place the banana puree, half and half, butter, vanilla bean and cinnamon stick in a small sauce pan over very low heat to melt the butter and infuse the flavors. in a separate pot with high sides, place the sugar, water and corn syrup. over medium heat, stir to dissolve the sugar. when it is dissolved, use a brush dipped in water to wash the sugar crystals from the sides of the pot-a crucial step to prevent the mixture from crystallizing. allow the sugar to boil until it begins to caramelize. when it starts to color, gently swirl the pan to keep it evenly colored. allow it to become a nice amber color. remove from the heat and carefully pour in the banana mixture. it will foam violently so use caution when doing this and combine the two mixtures slowly. return the pot to the stove over low heat and whisk to melt any caramel that may have settled to the bottom-2-3 minutes. remove from the heat and add the rum, whisk to combine and pour the mixture into a heat proof bowl. remove the vanilla bean pod and the cinnamon stick and allow the mixture to cool. serving it hot will melt the whipped cream.

to serve, place slices of the pie on plates and drizzle with the caramel. to anyone that cares to bake along, send me photos and i will post them. email me at bakinbabe116@aol.com and your photos will be added to the next entry.

Sunday, December 26, 2010

sawdust pie, #4 of 52 and the first round up photos

this last week was one big bake-a-thon. cookies, cookies and more cookies...cranberry sauce, gingerbread trees, pie shells and of course, a pie for the weekly challenge. two pies, actually and they came out tastier than i would have thought possible.
gingerbread stars, chocolate cherry cha-chas and peanut butter granola cookies with chocolate chips were only a few of the cookies i baked. the gingerbread stars were stacked to form a tree and all were used to make cookie trays for friends and neighbors.

each year we travel to my cousin's house in paducah, ky to celebrate christmas with his family. as we drive up i24, we pass a brown tourist sign for a place called patti's 1880's settlement...whatever, mumbo jumbo. it doesn't matter, we don't stop on this trip since it is only 2 hours and from what i have heard, it is a touristy place. anyway, i was curious about what it was one day a long time ago (we have been making this drive for 10 years) and i looked them up to see if maybe it might be a place to visit and in the process, i discovered that they are famous for sawdust pie. my capacity for remembering useless information sometimes helps me out and it was because of this talent that i remembered sawdust pie and thought i would try it for this week's challenge.

virtually every recipe i encountered was the same-egg whites, sugar, graham cracker crumbs, pecans and coconut. can i just say that i am not a fan of graham cracker crumbs, at all. in the cafe, i have buckets of biscotti crumbs in several flavors that i make myself from biscotti that i make so i do not have to use graham cracker crumbs, ever. well, i decided to go ahead and follow the recipe, kinda sorta in my own fashion. we always have cinnamon graham crackers in the closet because you never know when it might be a smores night so i used them instead of the plain kind. the other changes i made were to toast the pecans and the coconut and add a little vanilla extract to the list. i followed the directions and was surprised that the outcome was a lot better than i expected. then i went on and made a chocolate version to test my theory that this pie can be made with many different combinations of crumbs, nuts and coconut.
for the chocolate version, i used chocolate graham crackers and sliced, natural almonds which were first toasted and then pulsed in the food processor to make them more like sawdust.
chocolate and vanilla sawdust pies

the original recipe i used is here. the intro to the recipe mentioned whipping the egg whites but the directions said nothing about that. i looked at half a dozen recipes and none of them mentioned whipping the egg whites so i eliminated that and just whisked things together. we also did not bother with the suggestion of serving this with whipped cream and bananas-it was plenty sweet without that.

sawdust pie-1 (9") pie serving about 8, adapted from allrecipes.com
if you use purchased whites rather than separating your own, use no more than 1 liquid cup, regardless of what the chart on the carton tells you-the pie will be dry with more than a cup. when you buy graham crackers, they have several packages in each box and one package will be enough to make the pie-grind that one package and measure out what is needed.

1 prebaked 9" pie shell (refer to pie #2 for hints on this)
7 egg whites
1 1/2 cups sugar
1 teaspoon vanilla
1 1/2 cups graham cracker crumbs-any flavor
1 1/2 cups toasted nuts, pulse them in the food processor if they are large pieces
1 1/2 cups toasted flake coconut


preheat the oven to 350. partially bake the pie crust and toast the nuts and coconut if you haven't done so already. place the pie pan on a sturdy baking sheet. in a mixing bowl, whisk the egg whites, sugar and vanilla until thoroughly mixed. fold in the crumbs, nuts and coconut and pour into the pie crust. bake until set, it will be slightly glossy on top and it will puff up and feel firm to the touch around the sides but the middle will be a little soft, about 45 minutes. allow the pie to cool before cutting.


my first pie round up!!!

imagine my surprise when i checked my email and found photos from a baker that had used my tamale pie recipe. it was a nice christmas present, even better was the fact that her family enjoyed the pie.
jennifer maier and her daughter made the pie together and it was well received by the family.

looks delicious, by the way, my family devoured it too! great job jennifer, i look forward to more photos, hint hint...

to anyone that cares to bake along, send me photos and i will post them. email me at bakinbabe116@aol.com and your photos will be added to the next entry. have a safe and happy new year!

Sunday, December 19, 2010

tamale pie, 3 down, 49 to go

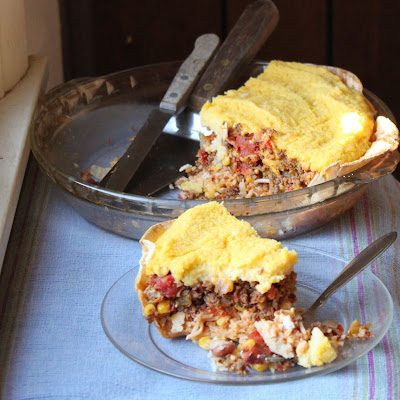
since i like to try new things, i thought i would go savory this week with my third pie. for some time now, i have wanted to try a tamale pie. tamales are one of my favorite latin american foods and i was hoping to get that combination of flavors and textures and transfer it to a pie. maybe next time, this(my second of two attempts) is more like a combination of a burrito and a tamale but even so, the flavor was very good and i even caught my husband going back for seconds, something he didn't do on the first attempt.

since a tamale pie was a new dish for me, i started off by using a recipe i found on about.com and you can look at the original recipe here. after looking at several recipes, i settled on this one because it did not use cornbread as the topping. this one used a cooked cornmeal mixture-like polenta but thinner as the crust and the topping. somehow, the amount called for seemed to be very short and hardly enough to do the job of a bottom and top crust. my solution was to take a small stack of corn tortillas and use them to line the pie plate. turns out that using tortillas was a good idea. they are lower in fat than a traditional pie crust and worked out pretty well. i definitely plan to try using them again in a similar recipe but keep in mind, they are not nearly as sturdy as a pie crust and will not offer any support to a warm dish-i just about had to use a spoon to scoop out the servings. to get the photo, i had to wait until it sat in the fridge over night.

if anyone out there bakes a pie using this recipe, send me a photo and i will post it here in a round up. so go ahead, bake one of the pies in the challenge-i dare you, double dare you, pretty please with sugar on it...okay, no more pleading but i promise that if you send me a photo of one of the pies, i will post it. happy baking!
beef tamale pie-serves 6
adapted from about.com

8 corn tortillas
1 cup cooked rice-a great use for leftover rice (something i always seem to have)
6 ounces mexican crumbling cheese, i used one called panela
1 pound lean ground beef-you can use any type of ground meat for this including soy crumbles
3-4 tablespoons olive oil
1 cup diced onions
2 tablespoons finely diced fresh chilis-i used 3 red serranos (less if you use habaneros!)
1 tablespoon minced garlic
1 can (14.5 ounces) roasted diced tomatoes with the juice
1 cup corn kernels-frozen or fresh
1 small can diced green chilis
1 tablespoon chili powder
1 teaspoon ground cumin
1 teaspoon salt
2 cups cold water
2/3 cup yellow cornmeal
1 tablespoon olive oil
1/2 teaspoon salt

lightly grease the pie plate and line it with 7 of the tortillas by placing them around the side in a circle. there will be a small area in the middle where the tortillas will slightly overlap, place the final tortilla in the center and this will give the bottom a little more thickness. sprinkle the rice evenly over the bottom of the pie shell. crumble the cheese evenly over the rice and set this aside for now.

in a skillet over medium heat, cook the ground meat in up to 2 tablespoons of olive oil (if using a nonstick pan, the oil will not be necessary). keep stirring and breaking up the meat as it cooks so it will be free flowing and not in large clumps. when cooked, pour into a strainer set over a bowl to drain off any of the rendered fat that has collected in the pan. heat 2 tablespoons of olive oil in the skillet and saute the onions, chilis and garlic until the onions are translucent. add the drained meat, the tomatoes with their juice, corn, green chilis, chili powder, cumin and salt and allow this mixture to simmer over medium low heat for about 10 minutes. the moisture should be reduced a bit but it will not be dry, and will appear a little saucy. preheat the oven to 375. pour this mixture over the rice and cheese in the pie plate and level it out.

in a small pan, combine the water, cornmeal, oil and salt and cook over medium low heat until it thickens to a mush-like consistency. spread this mixture over the top of the pie and bake for 40-45 minutes or until the internal temperature is 170 degrees for most ground meats. allow the pie to sit for 10-15 minutes before serving.

Sunday, December 12, 2010

just one day late; #2 of 52 pies

i'm not a fan of snow. ok, i've gone and said it out loud...actually, i really do not like snowy weather at all. and for me, driving in it is not an option that i look forward to either. give me any kind of weather besides cold/snow and i'm happy. by now, you should realize that it is snowing in nashville, has been doing so all day. needless to say, i haven't left the house and have no plans to do so.

so now that we know i am housebound (because that single inch of snow out there is holding me back) just how did i entertain myself? with a bad holiday movie, it's even worse sequel and with pie #2. and any of you adventurous sorts out there that want to try this at home, please do and then send me a picture(bakinbabe116@aol.com) and i will post it here, a round up if you will for anyone who dares...

when i was working on my recipes for the book that i just finished, i tried to include one of my favorite shortcuts/hints but i was forced to leave it out. apparently, it is viewed as not user friendly and too difficult for the average home baker-it would require a purchase deemed unrealistic for many folks. moving right along, i have chosen to use it here.
whenever i make pies or tarts that require a prebaked or completely baked crust, i always line the empty crust with a restaurant sized coffee filter and fill it full of dried beans or as pictured above, marbles. in the cafe, it is always dried beans, pintos to be exact but here at home, i just fill it full of marbles. the great thing about those paper filters is that they are designed to hold weight-especially when wet. it is entirely possible to lift out a filter full of beans by gathering the paper edges-the filter is strong enough to hold the beans without tearing. marbles on the other hand are heavy and i generally spoon them out. inevitably, one or two hit the floor and alas, i am always losing my marbles...and the reason this hint was not acceptable, it would require people to buy huge packages of filters at the restaurant supply or membership store and that was what didn't fly; we can't ask the readers/users to buy 250 of them. so i suggest that you find a friend in a restaurant or coffee house and convince them to sell you a few. my reason is simple; its easy to work with. foil makes creases in your crust and can cause breakage when you remove it. parchment paper becomes brittle and you cannot lift it after baking it. lastly, wax paper is waxed and who wants to add wax to a pie?

getting off the soapbox and back onto the pie now. in the winter, citrus fruits come into season and they are one of the few bright spots in the world of flavors when the weather is dismal. i found myself with a bunch of lemons that needed to be juiced, i had zested them previously, and i let that be my inspiration.
not just lemon meringue pie, but a lemon cream in an almond crust with a bit of rose hip jam.

i cooked a fresh lemon curd and folded in some whipped cream. the toasted almond tart shell was completely baked and a thin layer of rose hip jam was spread over the bottom. the lemon cream was poured into the shell and topped with a big dome of meringue. since i am not one of those pastry chefs who has to have a torch in her kitchen (don't need any help setting the kitchen on fire, refer to this previous post) i put it under the broiler and let it get a little too toasty-but i like my marshmallows a little dark and crunchy, thank you very much...

meringue topped lemon cream tart with and almond crust-serves 8

almond crust-makes 1 standard 9" tart shell (use a pan with a removable bottom)
1/2 cup sliced, natural almonds
1 cup all purpose flour
6 tablespoons powdered sugar
6 tablespoons unsalted butter, cut into small cubes
1 egg yolk mixed with 2 teaspoons water

preheat the oven to 350. toast the almonds until golden, about 7 minutes and let them cool completely. place the almonds, flour and sugar in the bowl of a food processor. pulse them to combine them. add the butter and pulse the mixture until the butter is no longer in lumps and it resembles coarse meal or looks sandy. add the egg mixture and combine completely to form soft dough that holds together when squeezed. the dough can be worked with immediately; it does not need to rest like pie dough before rolling and can be pressed into the tart pan with your fingers. place the tart shell on a baking pan, line it with the coffee filter and weights. bake it completely since it will not be returned to the oven to bake again-about 25-30 minutes. carefully remove the filter and weights and allow the crust to cool completely before removing it from the pan.


lemon cream filling
3 tablespoons cornstarch
1/4 cup water
4 egg yolks
3/4 cup sugar
1/2 cup fresh squeezed lemon juice
zest of one lemon
1/2 cup heavy cream, whipped stiff
place the cornstarch in a heat proof bowl and whisk in the water to make a lump free mixture. whisk in the egg yolks and set aside. in a small, heavy bottomed pot, combine the sugar and lemon juice and over medium heat, bring the mixture to a boil. slowly whisk the hot syrup into the egg yolk mixture and then pour this mixture into the pot and return it to the stove over low-medium heat. whisk the mixture as it returns to a boil, allow it to boil for a minute and then pour it through a mesh strainer into a clean, nonmetal bowl. stir in the lemon zest, press plastic wrap to the surface and chill completely. when cold, fold in the whipped cream

meringue topping
3/4 cup egg whites, about 6 large whites
1/4 teaspoon cream of tartar
3/4 cup sugar
in a large bowl, combine the egg whites and cream of tartar. with a mixer on high speed, whip the mixture until foamy. slowly add the sugar and continue to whip it until stiff peaks form.

to assemble the tart, carefully remove the crust from the tart pan and place it on a heat proof plate that is flat. spread 3-4 tablespoons of a darkly colored jam (such as raspberry, blackberry or other seedless flavor) over the bottom of the tart shell. top it with the cream filling and distribute it evenly in the shell. dollop the meringue over the cream filling and if spikes are desired, quickly tap a spoon to the meringue and pull it away to form the spikes. the meringue can also be piped on to the filling. place it under the broiler to color it-watch it carefully or you may burn it!

Friday, December 3, 2010

if it's pies you that you want...

have you heard the news? pie is the new big thing, the "it" girl of the dessert world for the new year. according to the folks who predict food trends, pie will be the number one food trend in 2011. honestly, where have they been keeping their heads? here in the south, pie is always a big thing! can you imagine a meat and three or a country market without pies? how about a potluck dinner? or a family get together? in little mom and pop businesses all over the south, whether they are restaurants or gas stations, if there is food sold, there is most likely some sort of pie-mainly a chess pie or some variation of one and if you are really lucky, fried pies. at the cafe, we generally have anywhere from 6 to 9 different types of pie to choose from daily. stop by today and you will find a house specialty-turtle pie. pictured above as it is being dressed for display, i start out with a homemade cookie crumb crust with nuts in it, fill it with a homemade caramel filling (sweetened condensed milk that is slowly cooked in the oven until it is a dark golden color) and topped with a semisweet chocolate glaze and pecan pieces.
here is a glimpse of the finished pies, all dressed and ready to party! don't hesitate on this one, it really sells fast and since it can take a whole day to make them, i only make a batch when i can spare half of the oven for at least 4 hours-no joke, large quantities take a lot longer than you think!

this brings me to my next project. since the powers that be, you know the movers and the shakers of the prediction realm say that 2011 is the year of the pie, i am going to make pies. ooohhhhhh, something that i don't do everyday...canning the sarcasm for a moment, i plan to make one pie each week for the next 52 weeks. each one will be an original pie and i will post recipes-something i very rarely do. the exciting part is that my final pie will land here during the week of thanksgiving. hopefully, you will bake along with me and share photos of your efforts. to anyone that does, i will post the photos here as well. just to get things moving, i baked a pie. a very special pie. pumpkin pie is one of my favorite pies. but that whole turtle pie experience (see above) had me thinking. what if i took a pumpkin pie and combined it with a turtle pie...
rich and gooey...spicy and creamy...too good to be true, but it is. first, i made a crust using gingerbread biscotti crumbs (homemade of course). i mixed up half of a batch of pumpkin pie filling and baked it in the crust. as it cooled in the fridge, i caramelized some sweetened condensed milk in the oven (using a water bath!). when it was done, i spread it over the top of the pumpkin filling. i let that cool over night and then this afternoon, i made a glaze using some semisweet chocolate. after spreading the glaze over the pie, i sprinkled on some toasted pecan pieces. sounds like a bit of work but sometimes, you just gotta do it!

pumpkin turtle pie

makes 1 (9") deep dish pie

2 cups cookie crumbs-gingersnaps or gingerbread cookies
6 tablespoons unsalted butter, melted
4 tablespoons sugar
1 cup pumpkin puree
1/3 cup brown sugar
1 1/2 teaspoon pumpkin pie spice
1 whole egg
1 egg yolk
2/3 cup half and half
1/4 cup pecan pieces
1 (14oz) can sweetened condensed milk
4 ounces semisweet chocolate
1/4 cup half and half

preheat the oven to 350. combine the cookie crumbs, melted butter and sugar in a bowl and using your fingers, mix well to combine. press the mixture into a pie plate so that the sides and bottom are all evenly covered. in a mixing bowl, whisk the pumpkin with the brown sugar, pumpkin pie spice, whole egg and egg yolk. scrape the bowl, add the half and half and mix thoroughly to combine. pour the filling into the pie shell and bake until set, about 30 minutes. remove the pie from the oven (but leave the oven on) and allow it to cool a bit at room temperature. when the pie has cooled enough to handle it (just to make it easier to move around) place it in the fridge to get cold. place the pecan pieces in an oven safe pan and toast them for 5-7 minutes, allow them to cool and reserve them for decorating the pie.

pour the sweetened condensed milk into a 1 quart baking dish, preferably one with a cover. place this dish in a pan of water to make a water bath and bake. every 20 minutes, carefully open the dish and using a heat proof spatula, scrape the dish well and stir the mixture. this ensures that the caramel cooks evenly. it will take about an hour and a half for the caramel to reach a nice dark amber color. when it is finished, carefully pour the mixture over the top of the pumpkin pie and return the pie to the fridge to cool over night.

to make the glaze, place the chocolate and the half and half in a microwave safe bowl. using the lowest setting or the defrost cycle, heat in 30 second intervals until the chocolate is completely melted. whisk the glaze until it is smooth and spread it evenly over the caramel. sprinkle the pecans over the top and allow the glaze to set completely before cutting, about an hour at room temperature, sooner in the fridge. for clean cuts on your slices, dip your knife in hot water after each cut and be sure to wipe it clean before making the next cut. serves 8-10.