Showing posts with label bundt cakes. Show all posts

Monday, June 2, 2014


sunday mornings are perfect for gardening.  there is a certain sense of peace that the demonstration garden has early in the day which i find comforting.  today i went out to the garden with a chocolate chip bundt cake and spent a few hours weeding the beds and chatting with my fellow master gardeners. as master gardeners, we spend time preparing gardens for tours and on occasion,  those gardens are our own.  it is a chance to share our most prized possession with fellow gardeners.  this afternoon, i had the pleasure of visiting the garden of one of my fellow demonstration garden volunteers.

to read the whole post, visit my new blog page

strawberry cake


strawberry season sneaks up on us and does not linger; it is sensitive to the cold and it is fleeting.   the berries can be quickly saturated, left waterlogged and tasteless by a day of rain.  gardeners with strawberries generally keep close watch on the berries as they ripen with daily trips to the bed to gather the ripest, reddest, plumpest fruits.  those that make it back to the kitchen may become any number of treats.  sorbet, ice cream, jam or cake-too many choices and honestly, most are consumed as they are picked; who can resist just picked berries?  not me, that is a fact.

to read the entire post, follow this link to my new blog page

Saturday, March 8, 2014

marbled pound cake

two of my favorite things; bundt cake and pound cake.  two of my favorite things rolled into one; even better!  put it on an awesome vintage fenton cake plate; nearly perfection!  this cake plate came to us from my mother in law.  she sent it to us at thanksgiving and i have used it several times now.  apparently, i have a milk glass fetish and everyone in the family has caught on to it.  this cake plate makes even the simplest cake look rather elegant-it's the ruffled edge that does it.

for the last 2 years, i have been taking classes and workshops centering on photography and food styling.  it has been an amazing experience.  the people i have met, from professional photographers and food stylists to other bloggers like myself, have taught me so many things that have helped me to improve my photos.

to take the photo of this cake, i used black foam core boards to give it a dark background.  for the lighting, i let natural sunlight illuminate the scene and positioned bounce cards to fill in the dark spots.  then i let my collection of plates fill the shot.  these vintage stangl plates were a steal at the thrift store- just 69 cents a piece!
it was interesting to see how the shot changed as i moved things around, added and deleted things.

as much as i liked the stangl plates, i was afraid the pattern would distract from the marbled cake slices once i put them on the plates.  a quick change to vintage lu-ray pastels in blue with some daisies.

out went the daisies, in came some cocktail napkins and silver plate cake forks.  these items were also thrift store finds.  the silverware is actually from a partial set i found one day, over 20 pieces of silver plate marked community that is actually an oneida pattern.  my collection cost me less than $10 but an internet search found it priced at $130 for a service of 4:  SCORE!!!

yes, i still have much to learn in the world of photography and food styling, and i look forward to learning all i can.  but as far as thrift store finds go, i think i have mastered that part!

amazing how the shot changed as the sun came out and then again ducked behind the clouds.  when photographers talk about chasing light-they aren't kidding.  you can have your shot all lined up, settings all correct and in the blink of an eye, it is gone.  this dark shot is so moody, and almost depressing.  but at the same time, when the sun came out and lit up the set, it was just as interesting(see the next shot to view the difference).  be sure to visit here often, see what i have learned and what i have scored at the thrift store!

marbled pound cake bundt
makes 1 bundt serving 12-16

vanilla batter
9 tablespoons unsalted butter, softened
1 cup granulated sugar
1/4 teaspoon salt
1/2 vanilla bean-seeds only, scraped pod reserved for other uses
3 large eggs
1 1/2 cups cake flour
1/4 teaspoon baking soda
1/3 cup buttermilk

chocolate batter
9 tablespoons unsalted butter, softened
1 cup granulated sugar
1/4 teaspoon salt
3 large eggs
1 cup plus 2 tablespoons cake flour
1/3 cup unsweetened natural cocoa powder
1/4 teaspoon baking soda
1/3 cup buttermilk

preheat the oven to 350.  generously grease a bundt pan and set it aside.  the mixing directions for both batters are the same, mix the vanilla batter first, scrape it into a bowl and set it aside.  without cleaning the bowl and beater, mix the chocolate batter and fill the prepared bundt pan.

to mix the batter, place the butter, sugar and salt (and vanilla bean seeds for the vanilla batter) in a mixing bowl and cream on medium-low speed until fluffy, about 2-3 minutes.  carefully add the eggs, one at a time and scrape the bowl as you go to fully incorporate the ingredients.  the batter will be a little loose at this point but do not worry if it looks a little scrambled-it will come together with the addition of the dry ingredients.

place the cake flour and baking soda (as well as the cocoa powder for the chocolate batter) into a sifter or a mesh strainer and sift them over the batter in the bowl.  using a rubber spatula, fold it in the flour a few times.  sprinkle the buttermilk over the batter and fold it together completely.  

to fill the pan, drop spoonfuls of the vanilla batter randomly into the pan-only use half of the batter and be sure to leave gaps between spoonfuls.  fill the gaps with spoonfuls of half of the chocolate batter.  repeat the process to make a second layer of batter but be sure to alternate placement so that vanilla covers chocolate and chocolate covers vanilla.  using a butter knife, carefully swirl the batter by plunging it into the batter and stirring gently from top to bottom as you turn the pan in a circular motion.  it does not need much stirring-the more you stir, the less contrast the pattern will have when the cake bakes.  make sure the batter is evenly distributed in the pan so that the cake will bake evenly.  bake until a pick inserted comes out clean, about 45-50 minutes.

cool the cake in the pan for at least 15 minutes.  carefully turn it out onto a rack by placing the rack over the pan and inverting it.  it may take a few taps for it to fall out.  

Thursday, March 6, 2014

pumpkin bundt with a milk chocolate chip and cinnamon sugar ribbon

and the bundt love continues.  the latest recipe to join the club, a pumpkin coffeecake with a ribbon of milk chocolate chips and cinnamon sugar.  just one more example of how versatile that base recipe i love to use is and how easy it is to transform it into something completely different each time.  this cake was headed out to the garden and since only a few volunteers came out, i had a lot of cake left over.  not to worry, i had to work the next morning and the cake went with me; my coworkers devoured it and all i had left was a dirty cake plate.  the use of milk chocolate chips means that the chocolate does not dominate the flavor profile-it gives just a hint of chocolate along with a little spice of the cinnamon and that is a good thing for those folks who are not big fans of chocolate or spiced chocolate.

sometimes, all a bundt cake needs is a little dusting of powdered sugar to dress it up.  a beautifully sculpted pan doesn't hurt either!  this one was a christmas gift from my mother in law and i have used it several times now.  now matter how simple the cake is, the pan makes it look rather elegant.  almost too elegant, i have to tell people, "please, go ahead, cut it!  have a slice!" because they are almost afraid to do just that.

pumpkin bundt cake
with a milk chocolate chip and cinnamon sugar ribbon
makes 1 bundt cake serving 12-16

6 ounces unsalted butter, softened
2 cups granulated sugar
1/2 teaspoon salt
3/4 cup pumpkin puree
3 large eggs
3 cups all purpose flour
1 tablespoon baking powder
1-1/2 teaspoons pumpkin pie spice
3/4 cup buttermilk
1/2 cup milk chocolate chips
2-3 tablespoons cinnamon sugar
powdered sugar

preheat the oven to 350.  grease and flour the tube pan and set it aside.  to make the batter, place the butter, pumpkin puree, sugar, and salt into the processor bowl and process until smooth.  with the motor running, add the eggs, one at a time and process until mixed.  scrape the bowl and pulse a few times to be sure it is combined.  dump the batter into a large mixing bowl; the rest of the recipe is combined by hand with a rubber spatula or a large wooden spoon.

place the flour, baking powder and pumpkin pie spice into a sifter or a mesh strainer and sift it over the batter.  fold the mixture a few times, sprinkle the buttermilk over the batter and fold it together.  carefully place half of the batter into the prepared pan and spread it out so there are not huge gaps and vacant areas-it does not need to be perfectly level.  sprinkle the cinnamon sugar over the batter in the pan and top with the milk chocolate chips.  carefully spread the remaining batter over the ribbon and bake until a pick inserted comes out clean, about 1 hour.  cool the cake in the pan for 20 minutes and then remove it from the pan and allow it to cool completely on a rack.

once the cake has cooled and is still on the rack, give it a liberal dusting of powdered sugar and then carefully place it on the serving plate.  the cake is best cut when completely cool.  to store, keep it covered in a cake container at room temperature up to 2 days.  to store in the freezer for up to a month, cut and wrap slices well in plastic and place them in a plastic container or bag before freezing.  thaw the slices, still wrapped in plastic, at room temperature.

Saturday, March 1, 2014

cherry frangipan coffee cake

cakes are wonderful.  so many flavors to try.  almost as many shapes to bake them in.  honestly, there is something really special about a tube pan.  whether it is baked in the standard angel food pan or a fancy bundt pan, does not matter, either type will work and all of them add a little extra magic to the cake.

bundts and tubes make great cakes for parties, picnics and potlucks.  they generally do not need much frosting and slice well.  for me, the cakes are the perfect gift to take out to the garden to thank my fellow garden volunteers for helping tend to the beds.  they are also a great choice to take to the class each week to share with the interns since slices can be nibbled without the need for a plate or fork.   the biggest challenge i face is choosing a flavor each week, sometimes twice in a week.  

this week, i chose to pair almond paste and tart cherries.  my favorite coffee cake recipe is so versatile that adding almond paste is a great way to make the same cake seem different.  this cake recipe uses the same base recipe as the cranberry-orange coffee cake i posted several weeks ago.  almond paste is easy to find, it is sold in the baking section of the supermarket, usually near the pie and pastry fillings.  the little cans have 8 ounces of almond paste in them and while it seems like a small amount, a little goes a long way in terms of flavor.  

when i open a can, i always cut it into four equal pieces and since i generally use just two ounces at a time for a coffee cake, i wrap each piece and store them in a container in the freezer.  then when i need some, i simply pull it from the freezer, cut it into cubes and let it thaw out and soften before adding to the batter.  to use in the recipe, i generally replace about 1/4-1/3 of the butter with almond paste.

another thing i love about tubes and bundts, you can hide a filling in them without having to worry about the cake collapsing from the weight!  for this recipe, i used some really well drained tart red cherries.

ssshhh...the filling is a secret!

and if the cake wasn't already enough, i went and added crumb topping.  actually, it could be that the cake was the vehicle for the crumb topping, just sayin...i love crumb topping!

beautifully baked-nothing else needed

however, i just couldn't help myself.  it seemed like such a waste to pour the cherry juice down the drain.  quickly, i stirred the cherry juice into some powdered sugar.

pink glaze for the top of the cake, add enough juice to make a slightly thin glaze that drips slowly from the spoon rather than running off quickly-a thicker glaze will stay on the cake better than a runny one.

now that's a coffee cake!  careful little drizzles prevented it from getting soggy and saturated with glaze.

cherry-frangipan coffee cake
1 (10") tube or bundt cake
serves about 16

crumb topping
1/2 cup unbleached all purpose flour
1/2 cup rolled oats
1/3 cup dark brown sugar
1/2 teaspoon ground cinnamon
1/8 teaspoon baking soda


4 tablespoons unsalted butter, cold and cut into small cubes

cake
4 ounces unsalted butter, softened
2 ounces almond paste
2 cups granulated sugar
1/2 teaspoon salt
3 eggs
3 cups all purpose flour
1 tablespoon baking powder
3/4 cup buttermilk
1 (14.5 oz) can tart red cherries, drained well, juice reserved
1 cup powdered sugar

to make the crumb topping, place the flour, oats, brown sugar, cinnamon and baking soda into the bowl of a food processor.  pulse a few times to combine.  sprinkle the butter cubes over the top of the mixture and pulse to cut it together.  continue to process the mixture until it begins to clump.  dump the mixture out of the bowl and set it aside.

preheat the oven to 350.  grease and flour the tube pan and set it aside.  to make the batter, place the butter, almond paste, sugar, and salt into the processor bowl and process until smooth.  with the motor running, add the eggs, one at a time and process until mixed.  scrape the bowl and pulse a few times to be sure it is combined.  dump the batter into a large mixing bowl; the rest of the recipe is combined by hand with a rubber spatula or a large wooden spoon.

place the flour and baking powder into a sifter or a mesh strainer and sift it over the batter.  fold the mixture a few times, sprinkle the buttermilk over the batter and fold it together.  carefully place half of the batter into the prepared pan and spread it out so there are not huge gaps and vacant areas-it does not need to be perfectly level.  arrange the drained cherries over the batter in the pan and top them with the remaining batter.  sprinkle the crumb topping evenly over the cake and bake until a pick inserted comes out clean, about 1 hour.  cool the cake in the pan for 20 minutes and then remove it from the pan and allow it to cool completely on a rack.

to make the glaze, sift the powdered sugar into a bowl.  while stirring, add enough of the reserved cherry juice to make a slightly thin glaze that pours off a spoon slowly.  drizzle small amounts of the glaze over the cake on the rack-how much you use is up to you, i used the entire amount for this cake.

the cake is best cut when completely cool.  to store, keep it covered in a cake container at room temperature up to 2 days.  to store in the freezer for up to a month, cut and wrap slices well in plastic and place them in a plastic container or bag before freezing.  thaw the slices, still wrapped in plastic, at room temperature.


Sunday, February 9, 2014

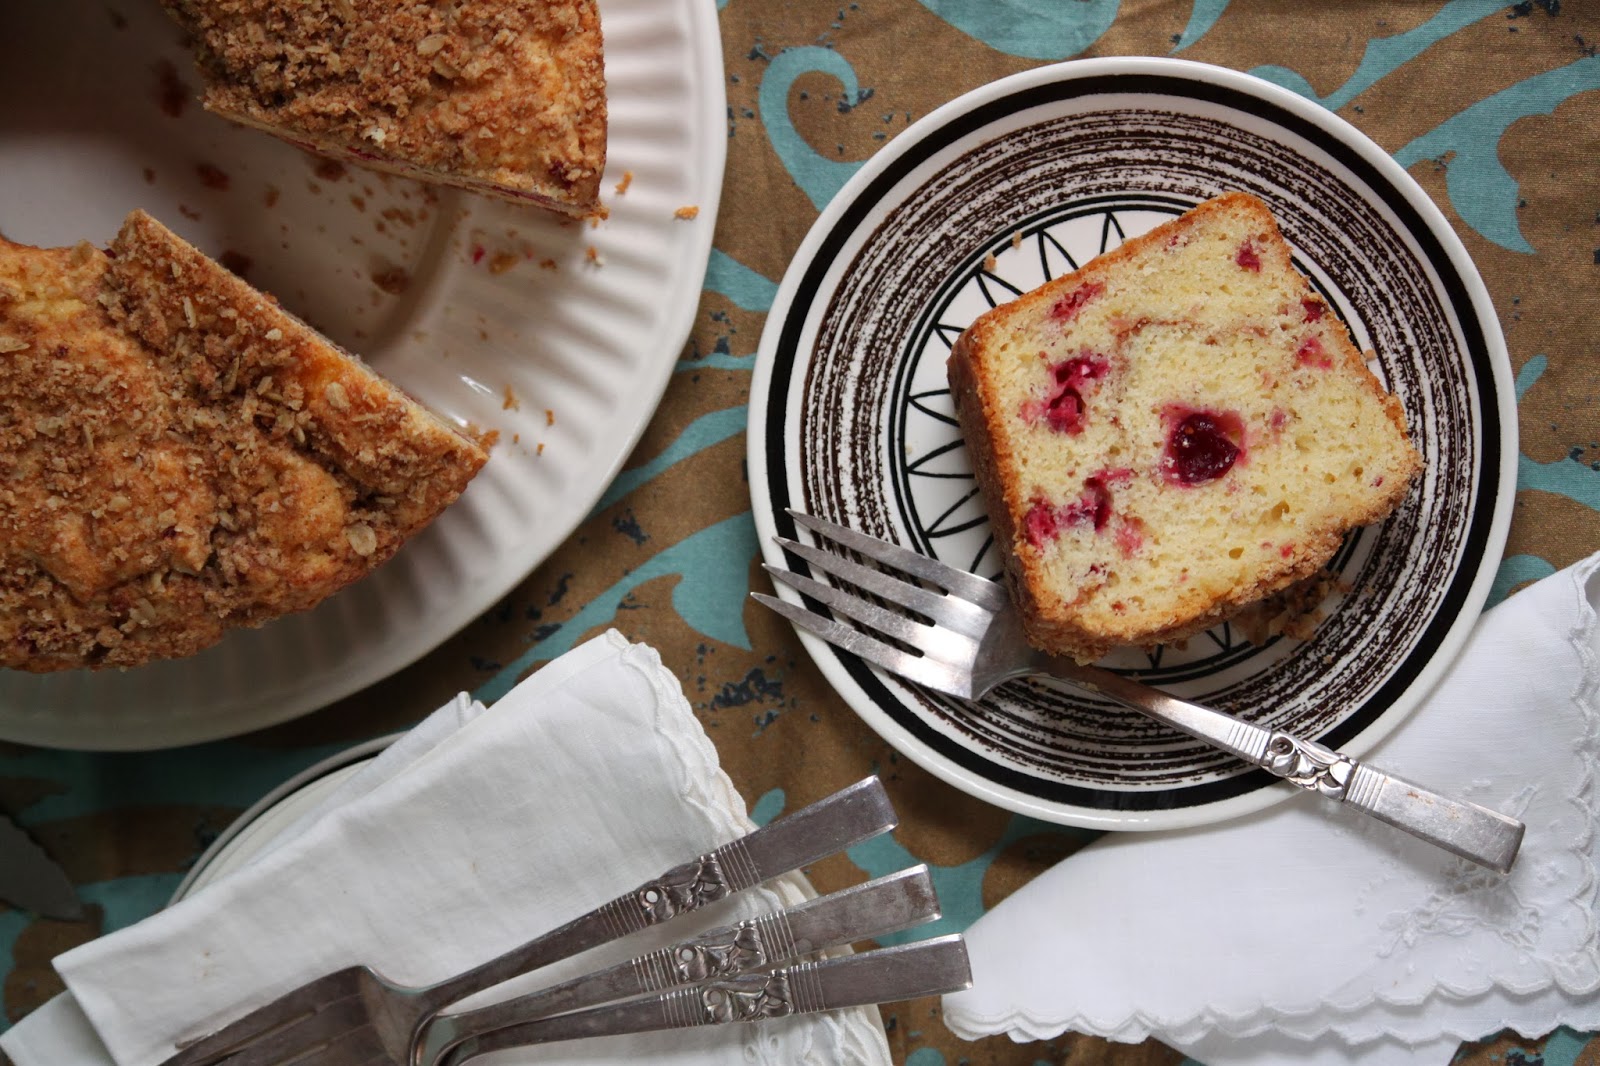
cranberry-orange coffee cake; a winter pick-me-up

want to know a secret?  gardeners are optimists.  honest, scouts honor.  think about it for a minute; we put teeny, tiny little seeds into large dirt plots and assume plants will emerge.  as if that wasn't crazy enough, we nurture those plants with the expectations of picking fruits and vegetables to feed ourselves.  in those terms, it almost sounds as if gardeners are a little on the crazy side.  and truth be told, we are.  who else but a dedicated gardener would go outside while the temperatures are just barely above freezing to plant peas and greens?  

by now, you must be wondering what gardening has to do with a winter pick-me-up of cranberry-orange coffee cake.  it actually has nothing to do with actual gardening but it does lead back to the gardeners themselves.  each january, the master gardeners of davidson county, tennessee, begin the annual 14 week training class.  every thursday evening, the new interns attend a lecture related to gardening and a few of the certified members, like myself, are on hand for mentoring, answering questions and offering support.  we also provide refreshments and snacks.  they quickly learn that i am known as "the cake lady from the demo garden."  it could be worse, i suppose.  

with a schedule of lectures lasting 14 weeks, finding a new(or different) recipe for each week is a challenge.  oddly enough, chocolate by itself, does not go over well.  if it is a ribbon or a handful of chips, okay; but just chocolate, not so much.  having a few good base recipes and a well stocked larder make all of the difference.  the recipe for the cake in the photos can easily be manipulated to use different fruits with the same level of success as the cranberries.  it is the perfect "go to" recipe for someone who bakes frequently and tires of making the same thing again and again.  

one big advantage to this recipe is that the majority of it can be completed in the bowl of a food processor.  a few quick pulses to make the crumb topping, a few pulses more to coarsely chop the cranberries and a final round to cream the butter, sugar and eggs for the batter.  the batter is rather forgiving and nearly foolproof so even the least experienced of bakers can mix up the recipe using the food processor and be guaranteed excellent results.

simple manipulations, such as swapping lemon zest for the orange or blueberries for the cranberries will still yield a beautiful cake even if the fruit is frozen.  for the more daring, shred some zucchini and carrots, toss in a generous helping of walnuts and a bit of cinnamon.  this cake is also the perfect solution for using that last, over ripe banana or that lonely apple resting in the bottom of the basket.  whichever route you take, this versatile recipe is sure to produce a well deserved pick-me-up to brighten a dreary winter day.

cranberry-orange coffee cake
makes 1 (10") tube cake serving about 16

crumb topping
1/2 cup unbleached all purpose flour
1/2 cup rolled oats
1/3 cup dark brown sugar
1/2 teaspoon ground cinnamon
1/8 teaspoon baking soda
4 tablespoons unsalted butter, cold and cut into small cubes

cake
1 cup fresh cranberries (can be frozen-do not thaw!)
12 tablespoons (6 ounces) unsalted butter, softened
2 cups granulated sugar
1/2 teaspoon salt
zest of 1 orange
3 eggs
3 cups all purpose flour
1 tablespoon baking powder
3/4 cup buttermilk
1/4 cup cinnamon sugar (3 1/2 tablespoons sugar, 1 1/2 teaspoons cinnamon)

to make the crumb topping, place the flour, oats, brown sugar, cinnamon and baking soda into the bowl of a food processor.  pulse a few times to combine.  sprinkle the butter cubes over the top of the mixture and pulse to cut it together.  continue to process the mixture until it begins to clump.  dump the mixture out of the bowl and set it aside.

preheat the oven to 350.  grease and flour the tube pan and set it aside.  place the cranberries into the processor bowl and pulse to coarsely chop them.  if they are frozen, do not thaw them or they will streak the cake batter so be sure to keep the chopped berries in the freezer until needed.

to make the batter, place the butter, sugar, salt and orange zest into the processor bowl and process until smooth.  with the motor running, add the eggs, one at a time and process until mixed.  scrape the bowl and pulse a few times to be sure it is combined.  dump the batter into a large mixing bowl; the rest of the recipe is combined by hand with a rubber spatula or a large wooden spoon.

place the flour and baking powder into a sifter or a mesh strainer and sift it over the batter.  sprinkle the cranberries over the top of the flour.  fold the mixture a few times to coat the berries with the flour and to begin incorporating them.  sprinkle the buttermilk over the batter and fold it together.  carefully place half of the batter into the prepared pan and spread it out so there are not huge gaps and vacant areas-it does not need to be perfectly level.  sprinkle the cinnamon sugar over the batter in the pan and top it with the remaining batter.  sprinkle the crumb topping evenly over the cake and bake until a pick inserted comes out clean, about 1 hour.  cool the cake in the pan for 20 minutes and then remove it from the pan and allow it to cool completely on a rack.  

the cake is best cut when completely cool.  to store, keep it covered in a cake container at room temperature up to 2 days.  to store in the freezer for up to a month, cut and wrap slices well in plastic and place them in a plastic container or bag before freezing.  thaw the slices, still wrapped in plastic, at room temperature.

Monday, January 6, 2014

caramel apple cake

the weather is a little crazy.  yesterday it was in the 50's in the morning and by early evening, it was raining, sleeting and snowing all at once.  it changed over to snow, we got our annual dusting and the temperature dropped like a rock!  it is 9 degrees outside right now...

before all of this crazy weather started, a few of my fellow master gardeners gathered to begin planning our big urban gardening festival.  a caramel apple cake seemed like the perfect choice for a meeting.

a quickly mixed and spicy cake that is chock full of chunky apples and pecans.  it is one of my favorite cakes to bake and share with friends; it makes regular appearances at meetings and in the garden.

the recipe has been posted before and this is a link to it.  for this one, i used pecans rather than walnuts and that bag of arkansas black apples in my fridge came in handy; i used two of them since they were so large.  for the caramel drizzle, use 1 cup of your favorite caramel sauce-preferably homemade.

to decorate the cake, allow the cake to cool about 15 minutes in the pan.  invert the cake onto a rack and place the rack over a sheet pan to catch the drips.  using a spoon, carefully drizzle half of the caramel over the warm cake.  let the cake cool completely then drizzle the remaining caramel over the cake.  if a lot runs off and collects in the pan, scoop it up and drizzle it again.  the cooler the cake and the caramel, the less likely it is to run off.  just make sure it is pourable or it will form thick globs on the cake-not very attractive, trust me on this.

arkansas black apples get their name from the deep red color of the skin.  it is such a dark red that it will almost look black at a quick glance.  the flavor is a bit floral in comparison to other apples and it they are wonderful for pies and sauce and just as tasty sliced up and eaten raw.  it is a true southern apple and we have a small tree in our yard and maybe this year we will get a few before the squirrels eat them all.

Saturday, November 23, 2013

i like big bundts!

pull out the turntable and cue up the sir mix-a-lot...sing a long if you can, "i like big bundts..."  no, i didn't get that wrong.  this is all about the bundts, bundt cakes that is.  november 15 is national bundt day and every year, mary, the food librarian holds a bundt bake-athon.  in honor of the big day, i made a bundt shaped loaf of sweet potato monkey bread.  to see the round up of all the bakers who also baked a bundt in honor of national bundt cake day, click on this link to mary's blog.

believe it or not, i actually used a recipe i found on pinterest.  shockingly, it actually worked!  of course, i made a few changes-had to make it mine.  tinkering with an untested recipe is risky.  generally, i fly by the seat of my pants and this time, i landed nicely.  to see the original recipe, click on this link.

sweet potato monkey bread
serves 10-12

1/2 cup buttermilk milk at room temperature
2 teaspoons active dry yeast
1/4 cup sugar
1/2 teaspoon salt
1 egg, beaten
6 tablespoons unsalted, divided
2/3 cup sweet potato puree
2 teaspoons ground cinnamon, divided
1/4 teaspoon ground nutmeg
2 2/3-3 1/3 cups bread flour

2/3 cup dark brown sugar

in a large stand mixer with the dough hook, stir buttermilk, yeast and sugar together. let it sit for 5-10 minutes or until it is foamy.  divide the butter, 2 tablespoons and 4 tablespoons.  melt them separately. stir in salt, egg, 2 tablespoons of the butter, sweet potato puree, 1/2 teaspoon cinnamon, nutmeg, and half the flour and mix. with mixer on, pour in remaining flour a tablespoon or two at a time until dough pulls away from the sides and is tacky but when touched, it doesn’t stick to your hands.  the dough may not need all of the flour, mine came pretty close to the full amount.  place the dough in a greased bowl and let it rise until double, about one hour.

grease a bundt or angel food cake pan with and set aside. punch down dough and place it on the work surface.  cut it into two equal portions.  roll each portion into a long snake, about 18" long and about 1" in diameter.   cut dough into 1" sections and roll each piece into a ball.  in a small bowl, mix the dark brown sugar with the remaining 1 1/2 teaspoons of cinnamon.  melt the remaining 4 tablespoons of butter in a bowl.  set up an assembly line by placing the bowls of cinnamon sugar and butter next to each other.  dip each piece in butter, then coat it with cinnamon sugar.  place each piece in the pan so that the pan is filled evenly.  sprinkle any leftover butter and cinnamon sugar over the top of the dough in the pan. cover pan with plastic wrap and either refrigerate it over night or let it rise until double, about one hour.

preheat the oven to 350.  bake until the top is nicely browned and the internal temperature of a section of dough (try to avoid the sugary parts) reaches about 200 degrees.  allow it to cool in the pan for about 15 minutes, turn it out onto a serving platter and allow it to cool for another 20 minutes or so.  cut into wedges or pull it apart.  keep in mind that when hot out of the oven, the sugary parts are like molten lava!  let it cool before trying to eat it!!!

Saturday, September 28, 2013

tiny tomato cakes keep them guessing

sometimes, i like to have fun with desserts.  my favorite game is to make people guess what the secret ingredient is.  once, for thanksgiving, i made a pie with white beans; it was fun to watch as our guests ate the pie while trying to guess what type of squash i used.  there have been many such desserts coming out of my kitchen.  a favorite of mine is tomato cake because it always keeps them guessing.

a recent outing with the nashville food bloggers included a pot luck lunch.  as a pastry chef, dessert is always my contribution to a pot luck meal.  naturally, i decided to have a little fun and make them guess the flavor.  to see the complete recipe, click here.
 my skinny muffin pan from ikea.  it is a little tricky to use.  even though it is nonstick, you really need to grease and flour the cups to ensure the cakes come out intact.

 the best way to present them, wrapped individually and dusted with powdered sugar.

in my search for bakers twine, the kind i remember from childhood, red and white and hanging from the bakery ceiling in a metal stringholder, i came across some cotton yarn.  it works very nicely and is so much cheaper!

Monday, August 26, 2013

a cake with tomatoes? absolutely!


you are not imagining this-i really am suggesting that you make a cake with tomatoes.  a spicy, moist cake studded with currants and pecans that is perfect for the extra tomatoes your garden is dumping on you hourly.  it is also good in late winter when dreams of a summer garden are all you have to keep you going in dreary weather.  honestly, it is good anytime; when isn't a bundt cake a good thing?  never, if you ask me.

it does not matter what type of tomatoes you use for this recipe.  they can be yellow, pink or red, even green.  what is important is that they taste good to you.  sweeter varieties will probably add a little to the sugar content of the cake but the tomato flavor really isn't detected in the final product.  the only exception might be that the redder varieties could give the cake a more golden-orange hue.  i haven't tried it with green tomatoes but i am thinking that the color may not be as pretty as the cake in my photos-i used deep red beefsteak tomatoes.

one final note, you can use your own homemade puree or if you do not have flavorful tomatoes to make puree, use tomato juice or canned whole or crushed tomatoes.  be sure to run them through the food processor to eliminate the chunks and be careful of using a brand with flavors added; no one wants garlic or onion in their cake.  

the tomatoes will need to be peeled first.  you could simply run them through a food mill to do this or mark an "x" on the bottom of the tomato with a paring knife and then lower the tomatoes into rapidly boiling water.  after 45 seconds to a minute, remove the tomato and check it by pulling at the skin where you cut it.  if it peels up easily, they are ready.  if not, put them back in the water for another 15 seconds and repeat the test.

the skin will peel off easily when they are blanched properly.  

cut the tomatoes in half, remove as much of the jelly and seeds as you can, roughly dice them and put them into the food processor.  pulse them to form a puree that has no detectable chunks of tomato.


so easy to make!  this is one of my favorite bundts.  

to see the recipe, visit my page on food52.com by clicking on this link.

go ahead, bake one, i dare you.  then send me a photo, i will post it here along with mine!

Friday, August 16, 2013

blueberry muffin cake and welding; a perfect saturday morning

now that the kids have ditched us, i have found myself looking for new things to do.  sure, i spend lots of time in the garden but when my husband is working late-and that happens frequently, i need something to keep me busy.  the perfect solution has been to take classes at watkins college of art, design and film.  they have a fantastic community education program and i have taken several classes there and am signed up to take several more.

in the spring, i looked through the class schedule and saw a workshop on welding.  it was strictly for beginners and it sounded like a lot of fun.  my friend shirley, who is also a master gardener, was quick in agreeing to attend the class with me.  girls and power tools; a perfect match.

we learned how to weld using oxyacetylene, mig and arc methods.  above, the method being used is oxyacetylene which is why they are not wearing the shields on their faces.

 oxyacetylene welding is easy to do and it was a lot of fun.  i could easily see myself doing this again.

 this was my favorite piece of equipment!  it is a throatless shear, which cuts sheet metal-sort of a big paper cutter on steroids.  to make my project, i cut each piece using this simple machine.

 this was the other fun part; curving the metal with rollers.  shirley is putting part of her project through the rollers to curve them.  i also curved a lot of my project with that roller.

and my finished project.  when i told everyone i was making a flower, they looked at me a little funny.  they looked at my skimpy little curvy pieces and told me, "sure you are making a flower, sure you are..."  they were all a little shocked when i finished it and it looked like a flower!  after a couple more coats of clear finish, it will live out in the garden.

and as always, if i go to the garden, i bring cake.  yes, i know this was a college, not a garden.  but shirley and i went to this class with the idea that we could learn a skill that might be useful for gardening.  gardening with sculpture, that is.

this cake is a bit of a mash up.  halfway to vegan, there are no eggs and several ingredients could be replaced to make it vegan if you like-or throw caution to the wind and make it ovo-lacto.

blueberry muffin cake
1 (10") bundt cake serving 12-16

ener-g egg replacer for 3 eggs (or 3 large eggs)
2/3 cup butter (or coconut oil or any combination of the two)
2 cups sugar
1/2 teaspoon salt
3 cups unbleached all purpose flour
1 tablespoon baking powder
1 1/2 cup fresh blueberries
1 cup buttermilk (or a nondairy milk such as coconut or soy)


preheat the oven to 350.  grease and flour the pan and set it aside.  if you are using the egg replacer, mix it according to the directions and while it sits, cream the butter with the sugar and salt until it is fluffy.  add the egg replacer and mix it just to combine.  place the flour and baking powder into a sifter or mesh strainer and sift it over the batter in the bowl.  pour in the blueberries and fold the mixture a few times to coat the berries.  add the buttermilk and fold completely until no streaks of flour or butter are visible.  scrape the batter into the prepared pan and bake until a cake tester comes out clean when inserted into the deepest part of the cake, about 1 hour.  allow the cake to cool on a rack for 20 minutes.  turn the cake out onto the rack and allow it to completely cool-if you can...

Monday, August 12, 2013

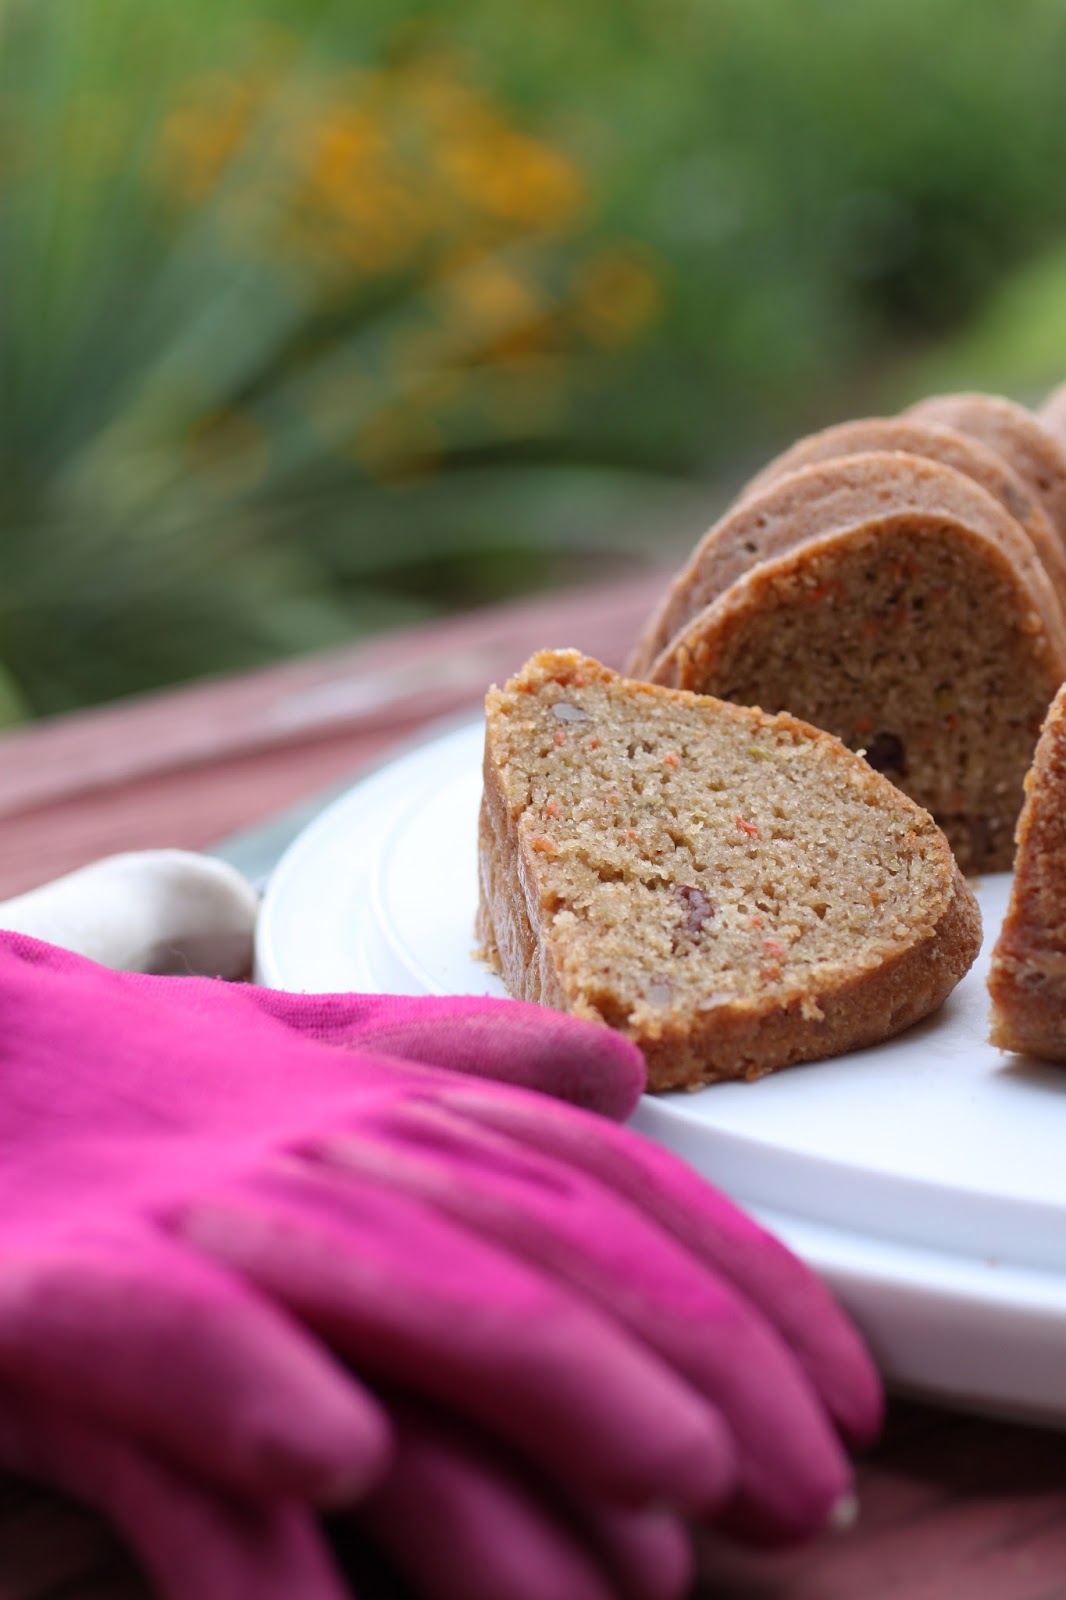
gardening for cake: zucchini-carrot bundt cake

sometimes, you have to resort to bribery.  to attract volunteers to the demonstration garden, we tell perspective volunteers that there will be cake to snack on.  we also tell them that there are plants and produce to share but the cake seems to get their attention quicker.  but baking a cake every week means that i have to find a recipe and secure the ingredients.  every now and then, someone comes out to the garden with a dietary issue that can make it especially challenging.  we recently had a few volunteers who followed a vegan diet and that makes baking cakes a real challenge.

believe it or not, butter adds moisture and flavor to cakes as well as texture from the fat.  eggs strengthen the structure and help add volume by holding the air that is mixed in during the baking process.  milk and buttermilk add flavor as well as moisture-try substituting water sometime, you will taste the difference.  let's not forget, a true vegan diet also means no honey since the harvesting process kills bees and honey adds moisture, helps retain moisture with its hygroscopic nature and honestly, it tastes really good in a cake!  when you have to eliminate these items, it can make baking a good cake difficult, even for a pro.
with the garden in full swing now, there are so many possibilities.  berries, figs, peaches, carrots, summer squash and let's not forget an abundance of herbs to choose from.  in my own garden, i had a few zucchini and some carrots to harvest and they both work well in cakes.  since this is a vegan recipe, i had to make a few changes to the original recipe.  the current darling of the diet world is coconut.  this recipe utilizes both coconut oil and an unsweetened coconut milk beverage rather than the traditional kind in the can.  to find these ingredients, check the natural food section of the grocery store.  the oil is sold in jars and is semi solid at room temperature.  the coconut milk beverage is packed in quart sized cartons and is sold alongside soy and rice milk.  substituting the eggs is tricky.  to get a nice texture with a small crumb, i find that ener-g egg replacer works the best and this can also be found in the same section of the store.

and for those of you that are not interested in baking a vegan cake, this recipe can be quickly converted.  substitute and equal amount of butter for the coconut oil, buttermilk for the coconut beverage and 3 large eggs rather than the equivalent amount of egg replacer.

vegan zucchini-carrot bundt cake
makes 1 bundt cake serving 10-12

1 medium to large carrot
1 zucchini
1/3 cup pecan pieces
4 1/2 teaspoons ener-g egg replacer (or 3 large eggs)
2/3 cup coconut oil (or 10 tablespoons unsalted butter, soft)
2 cups light brown sugar
1/2 teaspoon salt
3 cups all purpose flour
1 tablespoon baking powder
1 tablespoon pumpkin pie spice
1 cup unsweetened coconut milk beverage (or 1 cup buttermilk)

preheat the oven to 350.  grease and flour a bundt pan and set aside.  grate enough carrot and zucchini to measure 2 cups.  place the pecans on a baking tray and toast until fragrant, about 5 minutes.  let them cool before using.  whisk the egg replacer into 3 tablespoons warm water and allow it to sit while you begin mixing the batter.

cream the coconut oil with the brown sugar and the salt.  the oil will liquefy as it mixes so it is not necessary to mix for more than a couple minutes.  add the egg replacer and mix well, scrape the bowl too.  sift the flour, baking powder and spice blend over the batter.  fold it in a few times.  sprinkle the coconut beverage over the top of the batter and fold together.  sprinkle the zucchini and carrots over the top and fold together completely.  scrape it into the prepared pan.  bake the cake until a cake tester comes out clean, about an hour.  allow the cake to cool in the pan for 15-20 minutes and then turn it out onto a rack to cool completely.