Tuesday, June 28, 2011

peach-basil custard pie, #30 of 52

summer brings some of my favorite flavors; ripe, juicy peaches and basil.  my little peach tree is years away from providing an abundance of fruit so i must content myself with what i can find at the farmers market and the grocery store(my last resort).  however, i have plenty of basil in the herb garden to keep me stocked for the rest of the year!  we let it grow until the frost takes it and if we are paying attention, we pick as much as possible before it is killed off, puree it and freeze it in ice trays.  during the summer, basil ends up in lots of things; salads, vinaigrette, sauces and desserts.  wait, desserts?  yes desserts.  it blends beautifully with peaches!

for this weeks pie, i infused some milk with lemon grass, basil, star anise and cardamom pods.  it was then strained and used to make a custard with a lovely herbal flavor to fill the baked pie shell and topped with ripe, juicy slices of peaches.


anyone that has looked in a seed catalog or visited a nursery has seen the many different varieties of basil out there.  i plant as many as i can in my herb garden.  one of my favorites, pictured above, is from a friend.  jim, a fellow gardener, shared a plant with me two years ago and it has been reseeding itself in abundance.  this year, i returned the favor and gave away at least 25 of the plants but i still have at least that many left in the garden!  it is the most unusual basil i have ever encountered; it doesn't have the strong licorice flavor that most basils have, including the flavored varieties.  they only thing i can say about the flavor is that the scent of it makes me think of juicy fruit gum and as soon as i mention that out loud, everyone agrees.  another characteristic of this plant, it is a little hairy in comparison to other basils. so if you know what variety it is, let me know-and if it isn't a basil, tell me that too.  we have compared the flowers as well as the stems and leaves to all of the other basils and they are almost identical except for the hairiness and the scent.

peach-basil custard pie
1 (9") pie that serves 8

1 (9") fully baked pie shell, purchased or home made
basil custard, recipe follows
4-6 ripe, freestone peaches
1/4 cup peach jelly, jam or preserves (for glazing the tart)

for the pie shell,  use the recipe from pie #18 or pie #29 but follow the instructions for prebaking, regardless of which it is, by following the recipe for pie #29.  while the pie shell bakes, prepare the custard according to the recipe and chill it completely.  scrape the chilled custard into the cooled pie shell and top it with slices of peaches.  i made a circular design starting at the outer edge and working my way to the center.  place the jelly in a microwave safe bowl with 1-2 tablespoons of water.  heat on the low or defrost setting until the jelly boils.  stir it to smooth it out and using a brush, coat the peaches to seal them and prevent them from changing color.  

basil custard
2 1/4 cups milk
several lemon grass leaves, tied in a bundle
2-3 large sprigs of basil
3 green cardamom pods
1 star anise pod
4 tablespoons cornstarch
1/2 cup sugar
2 eggs
place the milk into a sauce pot with the lemon grass, basil, cardamom and star anise.  bring to a low boil and turn off the heat.  allow it to steep for at least 30 minutes.  strain the milk back into the sauce pot.  place the cornstarch in a heat proof bowl and dissolve it with some of the milk.  add the sugar to the sauce pot and over medium heat, bring it to a boil.  whisk the eggs into the cornstarch mixture.  using the directions for pastry cream in pie #29, temper the eggs and cook the custard until thickened.  strain the custard into a heat proof dish and press plastic to the surface.  chill until completely cold.

and as always, make one and send me a photo-i will post it here!  bakinbabe116@aol.com
may the power of basil be with you...

Wednesday, June 22, 2011

what's growing on?

the more you listen, the more you hear in regards to knowing where your food comes from.  hardly a day goes by that we are not reminded of how much harm we inflict on the ecosystem with our insatiable appetites.  luckily, the movement towards growing your own is catching on.  for the last 8 years, since we moved into our home, we have had a vegetable garden and growing our own produce has been a goal but not for ecological reasons; plainly put, it is a lot cheaper to grow your own vegetables and herbs.  over the years, we have branched out and have added things like honey bees and fruit trees.  we compost everything we can in an open pit composting system out back and we gather all of our leaves each fall too.

recently, a good friend convinced me to try my hand at a few new things that can be made at home:  kombucha tea and kefir.  the kombucha is fermenting on the counter and the grains for the kefir are ready to go as soon as i get myself some raw milk.

when i read the instructions that accompanied the kombucha, i was intimidated-they seemed so technical and unforgiving.  then i found instructions online from the website smallnotebook.org.  how simple!!!  that is as long as you have a friend, like anne, who is willing to give up a scoby so that you can brew your own batch.

this is the scoby pancake anne was kind enough to share with me.  she also gave me enough of the finished beverage to start/inoculate my first batch.

and here it is, the scoby in it's new home.  i plan to flavor mine with some fruit juice and most likely, i will not let it ferment as long as anne does.  the longer it ferments, the stronger it gets and that means it gets more sour with each day.  today is day 3 and i still have a few days to go.

another of my favorite things to grow at home, sourdough starter.  i started my original batch 2 years ago using grapes from the demo garden where i volunteer each sunday morning.  from that original starter, i have a plain starter and by feeding a small portion of it with rye flour and caraway seeds, i have a rye starter too.  periodically, they get neglected and i recently had to resurrect them.
with a cup of plain starter, 2 cups bread flour and a cup of water, i had a bowl of sponge to make bread with.
there is something so satisfying in taking a bowl of goo and after a minimal amount of effort, receiving something as tasty as this loaf of bread!

and for those of you that know my husband, you know this is all his!  he is obsessive about mushrooms and we have inoculate logs around the yard which currently produce shiitakes-aren't the gorgeous?  he recently inoculated some logs with oyster and reishi mushrooms.  

who knows what will be the next addition.  in the mean time, we're having fun and eating lots of good stuff.

Tuesday, June 21, 2011

celebrate the solstice with a summer berry tart; #29 of 52 pies

the first day of summer, or summer solstice as some call it, usually means hot weather and in that respect, we have had plenty.  since it is so hot, i decided to make a fruit tart rather than heat the house up by using the oven to bake a pie.  right now, markets are brimming with fresh berries of all types.  for some reason, summer holidays mean truckloads of berries at almost affordable prices.  why is that?  in the summers of my childhood, picnics in honor of summer holidays always meant popsicles and watermelon slices-berries were for special occasions.  on my last trek through the grocery store, i stocked up on strawberries and raspberries and luckily, enough survived to decorate the tart!

first step is to make a classic pastry cream.  while it cools down in the fridge, you can make the tart shell.  milk is heated with a vanilla bean and some sugar until it just begins to boil.
 cornstarch is mixed with some milk to dissolve it and then the eggs  are whisked in.  classically referred to as a liason, this combination will thicken the custard filling.
while the milk heats/steeps, set a heat proof bowl, a mesh strainer and a spatula nearby to strain the custard.
 once the milk reaches a slow boil, whisk a portion of the hot milk into the liason and then return the remaining milk in the pot to the heat.  while whisking the boiling milk, the liason is carefully added. and whisked continually until it boils and thickens.
whisk the custard filling continually until it boils and thickens.  be sure to let it boil for a full minute to cook out the starch.
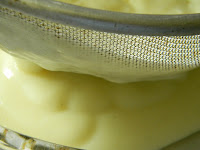
 once finished, pour the custard into the strainer and use the spatula to force it through the mesh into the bowl.
 the reason for the strainer, all the little rubbery bits and the vanilla bean need to be removed or you will not have a creamy filling for your tart.

 the simplest dough in the world!!!  flour, powdered sugar and butter are pulsed in a food processor until they resemble a coarse meal.  an egg yolk is added and the dough is pulsed until it comes together.
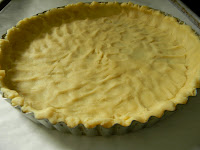
this buttery dough is so easy to work with that you can immediately press it into your tart pan-no chilling is necessary.
 make sure it is evenly spread out-thin spots could cause the shell to crumble later on.
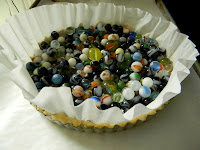
 my favorite baking trick-line the shell with a large coffee filter (bribe a barista for some if you can or just use several home sized ones) and use beans or marbles as weights to prebake the crust.  why a coffee filter?  simple, they are designed to hold lots of weight-think about wet coffee grounds in a filter, they do not rip easily.  parchment paper crumbles when it is baked, foil can cause breakage when removed from the tart and waxed paper is waxed and who wants that in the tart?
 a perfect tart shell ready to be filled and decorated.
 my next big secret;  melt 2-3 ounces of white chocolate (or dark if you prefer) and carefully coat the bottom and the sides of the tart shell with it.  this will help prevent the crust from becoming soggy.  allow it to set by freezing it for 5-10 minutes then fill with the custard and decorate with the fruit.
 slice the strawberries and arrange them around the edge of the tart.  save the small end pieces that you cannot use and place them in the center of the tart before adding the raspberries.  it's a shame to waste the end pieces and no one will know they are there!  if you must, you can seal the tart using a prepared tart glaze.  in the summer months, supermarkets by me sell small tubs of fruit glaze in the produce section but stick to the peach one and dilute it-the strawberry one has too much added color.  personally, i like mine naked!

solstice berry tart
1 (9") tart serving 6-8
there are lots of hints above, be sure to read them!

custard filling
3 tablespoons cornstarch
2 cups milk
2 eggs
1/3 cup sugar
1/4 vanilla bean, split
place the cornstarch in a heat proof bowl and whisk in a small amount of milk to make a smooth paste.  whisk in the eggs and set aside.  place the remaining milk in a sauce pot with the sugar.  scrape the vanilla seeds from the pod and add both the pod and the seeds to the milk.  over medium heat, bring to a slow boil.  temper the egg mixture with about half of the hot milk.  return the remaining milk to the stove and return to the boil.  while whisking the milk, add the hot egg mixture and while whisking, bring to a boil.  allow the custard to boil for a full minute then pour through a mesh strainer into a clean heat proof bowl.  press plastic wrap to the surface and chill completely.

easy tart shell
1 cup all purpose flour
1/3 cup powdered sugar
6 tablespoons unsalted butter, cold and cut into cubes
1 egg yolk
preheat the oven to 350.  place the flour and sugar into the bowl of a food processor.  sprinkle the butter cubes over the top and pulse to cut the butter in.  continue pulsing until the mixture resembles a coarse meal.  add the egg yolk and pulse until a smooth dough is formed.  press the dough evenly into a tart pan, place it on a baking sheet (catches any oily drips that may leak from the pan) and line with a coffee filter and weights.  bake until done, about 25-30 minutes.  remove from the oven and carefully lift out the weights and paper.  cool completely before assembling.

assembly
2-3 ounces chocolate (white or dark), melted
2 pints of strawberries
1 half pint raspberries
carefully remove the tart shell from the pan and place on a flat serving tray.  brush the inside of the tart with the melted chocolate and place in the freezer to set.  spread the custard filling evenly in the tart shell and arrange the fruit over the top of the custard as directed in the photos above.

happy solstice, y'all!  make one and send me a photo, i will post it here, bakinbabe116@aol.com

Tuesday, June 14, 2011

black and blue rhubarb pie, #28 of 52 pies

there is something special about a freshly baked berry pie.  a little sweet-a little tart and a deep rosy hue that draws the eyes, makes the mouth water and has the hands reaching for a knife and plate.  trying to develop an original recipe is a challenge on it's own but when you limit the categories to one and complete the task weekly...well, let's just say this isn't always as easy as it should be.  add a family that isn't always receptive to the chosen flavors and you can end up repeating the theme easily.  those of you who have followed this endeavor will no doubt find yourselves saying "hmm, she already used that ingredient" and you would be right!  my husband loves fruit pies as long as they aren't peach (go figure) and when i was pondering the choice of fruits, he wanted rhubarb.  since he will likely eat most of it, i decided to indulge him and make a rhubarb pie but rather than pair it with strawberries (as well as raspberries which i did for #18), i chose to go with blueberries and blackberries since they are both coming into season in the garden.

since not everyone has a freshly picked supply of blueberries and blackberries, buy them fresh or frozen.  you will need a total of 3 cups of berries which is a pound.  using frozen berries will make it possible to serve this pie even when the berries are not in season.

i am hoping to get some rhubarb crowns into the garden so i can harvest my own stalks.  believe it or not, my local supermarket has bags of sliced rhubarb available with the frozen fruits which means we can have a rhubarb pie anytime!  using purchased pie dough will save some time but for those of you not willing to compromise, make enough dough for a double crust pie using your favorite recipe or this one from pie #18


black and blue rhubarb pie
 1 (9") lattice topped pie serving 8-10

dough for a double crust, 9" pie
1 to 1 1/4 cup sugar
4 tablespoons cornstarch
zest of 1 orange or 3 mandarins (i chose mandarins!)
1 1/2 teaspoons apple pie spice (or cinnamon if you do not have any)

1 pound berries, about 3 full cups of blackberries and blueberries
1 pound of rhubarb slices, about 3 full cups

preheat the oven to 350.  grease a sturdy baking sheet, line it with parchment or foil and grease that as well.  line the greased pie plate with the bottom crust.  a whole lot of greasing going on?  this makes a sticky pie if the juices spill over during the baking and it will not be easy to remove from the baking sheet without the grease!  trim the excess dough so that only about 3/4" of dough hangs over the edge.  roll the excess dough under and flute the edges.  place the prepared pie crust on the baking sheet.

in a large bowl, rub the sugar, cornstarch, zest and spice together.  add the fruit and toss together.  scrape the filling into the pie crust and top it all off with lattice strips.  sprinkle some coarse sugar crystals over the strips and bake until it boils in the center, about 1 hour 15 minutes.   let it cool completely, about 4-6 hours, before cutting or you will have a never ending pie; no matter how many slices you cut, the filling runs out and fills the plate again!

so go forth in the world and bake a pie.  send me a photo and i will post it here!  bakinbabe116@aol.com

Wednesday, June 8, 2011

peanut butter-banana cream pie; #27 of 52 pies

has anybody noticed just how hot it is around here?  10+ days above 90, well above 90 on many of those days.  the thought of turning on the oven to bake a pie seemed ridiculous.  when the husband suggested i make a banana cream pie for this week's challenge, i balked at first;  i've done banana already, remember the banana creme brulee tart? i asked him.  well, as the day heated up and i began to wilt, i experienced a flash of brilliance.  okay, i was hungry and since peanut butter wasn't on the list of choices, i wanted it even more.  peanut butter and bananas in a sandwich on wheat bread...i had a salad instead and put the objects of my desire into a pie, substituting a chocolate cookie crumb crust for the bread, and then i topped it with whipped cream and called it dessert.

peanut butter-banana cream pie
1 (9") pie serving 8-10

4 tablespoons cornstarch
2 cups whole milk
6 egg yolks
1/2 cup light brown sugar
1/2 cup smooth peanut butter (homogenized is best)
1 cup heavy cream
2 tablespoons sugar
1 (9") chocolate cookie crumb crust-purchased or using the recipe that follows.
3-4 ripe bananas

place the cornstarch in a heat proof bowl, and add several tablespoons of milk and whisk to combine a smooth slurry.  whisk in the eggs and set aside.  place the remaining milk in a saucepot with the brown sugar and over medium-low heat, bring to a gentle boil.  carefully pour some of the boiling milk into the egg yolk mixture while whisking it carefully.  when about 1/2 of the milk is in, place the pot of milk back on the stove and return to a gentle boil again.  now begin whisking the milk in the pot and while whisking constantly, pour the in heated egg yolk mixture in a steady stream.  it is important to whisk this constantly while you bring the mixture to a boil.  it also must come to a complete boil to cook the cornstarch and thicken the cream.  when finished, pour the cream into a wide and shallow heat proof bowl, press plastic wrap to the surface and refrigerate until no longer warm. 

make the cookie crust while the cream cools.  when the cream is ready, slice up about 1 1/2 bananas and cover the bottom of the pie shell completely with them.  carefully spread half of the cream over the bananas.  using the remaining bananas, cover the cream with slices and once again, top it off with the remaining cream.   cover with plastic wrap and refrigerate for several hours to fully set the filling and make it firm enough to serve.

to make the topping, whip the heavy cream with the sugar until almost stiff peaks are formed.  spread evenly over the top of the pie and smooth it out with a decorating spatula (called a palatte knife).

chocolate cookie crust
11/2 cups chocolate cookie crumbs
1/4 cups chopped peanuts
6 tablespoons sugar
6 tablespoons melted butter-unsalted

combine the ingredients and press into a pie dish.  no baking is necessary but if you want a really crispy crust, bake it at 350 for 10 minutes.  allow it to cool completely before using.


so, you think you can bake do you?  prove it!  make one and send me a photo.  i dare you to, double dog dare you to...do it and i will post the photo here!!!  bakinbabe116@aol.com


Thursday, June 2, 2011

blueberry cheesecake pie, #26 of 52!

26 of 52 pies completed, 26 more to go.  that puts me at the halfway point.  from here, the number of pies left to bake will be smaller than the number of pies already baked.  so, the question is, will i make it to the goal?  i'm keeping my fingers crossed and hoping for the best.

this last "catch-up" pie was baked while my mother was still visiting-she came for the graduation and spent nearly 2 weeks with us.  it was fun, i never realize how much i miss hanging out with my mom until she arrives for a visit.  we spend lots of time wandering through antique shops and thrift stores and chattering about everything.  when it was time to bake this last pie, we chose blueberries as a theme and took mom (and our daughter and her boyfriend) to the demo garden(where we work as master gardeners) to pick some fresh blueberries.  we only ended up with about 2 cups of rather tart berries so making a pie with them was out of the question.  but i remembered my mothers love of cheesecake and decided to improvise.


a thinner more liquid cheesecake custard is garnished with a swirl of blueberry coulis before baking.   be sure to use a small spoon and pour in the coulis slowly (to prevent it from sinking) into the pie in random lines.  use a bamboo skewer to swirl the coulis around the top of the pie.  one hint, skip the fancy name brand cream cheese (you know the one named after the city of brotherly love) because it makes a custard that is runny like water!


after baking in a slow(300 degrees) oven, the pie is thoroughly chilled before serving.  use a knife that has been dipped in hot water to get clean cuts and be sure to wipe it off between slices.  the blueberry coulis can easily be doubled and the remaining coulis can be used as a sauce for the plate.


blueberry cheesecake pie

1 (9") pie that serves 8-10

coulis
don't forget, if you want extra sauce, double the coulis recipe but use only half of it to marbleize the top of the pie.
3/4 cup blueberries
1/3 cup sugar
crush the blueberries breaking all of them.  place them into a small saucepot with the sugar and over low heat, bring the mixture to a boil.  continue to boil for 5-10 minutes.  strain the sauce into a heat proof bowl and chill until no longer warm but do not let it get too cold-it will become gelatinous and hard to work with.

crust
purchase or make a cookie crumb crust in a 9" pie pan using the recipe in pie #16.  place the pie pan on a  sturdy baking sheet that will not warp in the oven.

cheesecake custard
12 ounces cream cheese-not the fat free stuff!
3/4 cup sugar
2 tablespoons flour
1/4 of a vanilla bean
zest of 1 lemon
3 eggs
1/2 cup sour cream
preheat the oven to 300.  this is mixed quickest in a food processor-fast and smooth.  place the cheese, sugar, flour, vanilla bean and lemon zest in the bowl of the processor and pulse to combine.  With the machine running, add the eggs, one at a time, and scrape the bowl thoroughly.  add the sour cream and pulse to mix, scrape the bowl and pulse a few times more.  pour the filling into the pie dish and bake until it is almost firm in the middle, about 40 minutes.  turn the oven off, prop the door open slightly and leave the pie in there for another 15 minutes.  remove the pie from the oven and chill completely before serving, about 4 hours.

and once again, if you bake one, send me a photo and i will post it here.  bakinbabe116@aol.com


Wednesday, June 1, 2011

almost caught up! #25 of 52, apple-pear pie

getting caught up...what a concept!  not so sure it will happen but i am giving it my best efforts!  for this pie, i decided to go a little outside the lines.  when you think of apple pie, tart green apples, cinnamon and other spices always come to mind.  they work well with pears too.  but this time, i decided to leave out the cinnamon and nutmeg and focus on some other flavors that work well with apples and pears.  first, i passed up the green granny smiths and used golden delicious apples.  how does vanilla bean, lemon zest and freshly grated ginger sound?  and one last twist-tapioca for the thickener rather than starch or flour.  this extra large and super deep pie was well received despite the lack of cinnamon.  use your favorite pie crust recipe or purchase the prerolled sheets to make it easier.  pyrex makes really deep and large pie plates, look for them in the supermarket with the kitchen gadgets or any other store that stocks pyrex dishes and kitchen ware.

deep dish apple and pear pie
easily serves 8-10

pie dough for a double crust pie-purchsed or using the recipe from pie #18
enough golden delicious apples to make 5 cups of slices
enough ripe anjou pears to make 5 cups of slices
1 cup of sugar
1 tablespoon freshly grated ginger-packed tightly
zest of 1-2 lemons
the seeds from one vanilla bean (reserve the pod for another use)
4 teaspoons (and up to 2 tablespoons) quick cooking tapioca
egg wash-1 egg mixed with 1 tablespoon of water
preheat oven to 350.  rub the sugar together with the ginger, lemon zest and vanilla seeds.  mix in the tapioca and toss the mixture with the apples and pears.  lightly grease the pie dish, line it with one sheet of the pie dough and fill it with the fruit mixture.  brush a little egg wash around the edges, top with the second sheet of dough and seal the edges.  trim the excess, roll the excess under and flute the edges.  cut a few vents and if desired, brush the crust with the egg wash and sprinkle lightly with additional sugar.  place the pie on a greased sheet pan and bake until it bubbles in the center, about 1 hour and 15 minutes.

on to the next one...and as always, bake one and send me a photo-i will post it here.  bakinbabe116@aol.com.