Wednesday, March 28, 2012

maple syrup-smoked pecan tart

the latest food52.com challenge-use maple syrup in a recipe.  easy enough, right?  but the thing is, too many recipes with maple syrup also use maple flavor and that is something that i do not care for.  maple syrup is a subtle flavor that when concentrated, it can be cloying to the palette.  that is probably why i hate pancake syrup and if i am going to eat waffles or french toast, the syrup will be a pure maple or it will be skipped.   so with my distaste for cheap syrup in mind, i let my mind wander and ponder what i could bake with the bottle of grade b maple syrup sitting on my pantry shelf.  wait, grade "b"?  yes, grade b.  why "b" and not "a"?  flavor, plain and simple.  grade b has a stronger flavor that grade a, it is also a little darker but in my book, it is perfect to bake with and no  maple-like extracts are required.  to find grade b, look in the syrup section of some supermarkets-possibly publix, or head out to whole foods or trader joe's since both carry a selection of grade b maple syrups.

 one of my latest thrift store acquisitions-a $2 deep 8" tart pan with a removable bottom

the plan is to make a pecan pie in a tart pan but with some liberties to the standard recipe.  for a perfect pecan pie-and trust me, i make hundreds of them, one must mix the filling ingredients in the proper order or the butter will separate from the filling and spill out of the pan during the baking and leave you with a puddle in the oven and a pie that almost looks deep fried.
 place your sugar, spices and flour (if the recipe calls for it) in a bowl and whisk to combine them.  break up the lumps so that when you mix the filling, there aren't any large sugar lumps left to sink to the bottom of the pie.

 melt the butter slowly-warm butter works better than boiled butter in the next step.

 in short, you are creating an emulsion.  add the butter and vanilla and/or other flavors to the brown sugar and whisk to form a smooth, glossy paste.

 to create the emulsion, the eggs need to be added carefully so only add them one at a time and whisk each one in completely.  scrape the bowl as you go.  this is with one egg added

 egg #2 whisked in

 egg #3 added and whisked in here.  do you see the difference in color?  it is nicely combined and the butter and eggs are blended together so that the filling will not separate in the oven.

 last step to make the filling is so add the syrup-in this case, it is maple and corn syrups that are added.

 to get a perfectly baked pie or tart, one must start with a partially baked shell.  there is nothing worse than getting a forkful of gummy under baked crust along with a bite of pie!  here i use my favorite trick-a restaurant sized coffee filter and marbles.  coffee filters are designed to hold a large amount of wet grinds without tearing.  they absorb a little of the grease so that it doesn't stick and you can literally lift the filter with the weights right out of the tart shell and set it aside to cool.  filters do not get brittle like parchment, they do not cause creases and cracks like foil and they do not melt like wax paper so if you can get ahold of some, give it a whirl!  and just so that you don't think i have lost my marbles, those are my pie weights!

 while any pecan would work, i like the smoky flavor of pit smoked pecans.  it adds something to the tart and the way the flavors of maple and smoke (think bacon without the pig here) work together transcends a basic dessert staple into something really special that will have them reaching for seconds.  to amp up the flavor, i also added a little dry rub to the filling but you could skip that and if you are really adventurous, you could try using a little ground chili to add another dimension.

 place the nuts in the shell and pour the syrup over them-this gets them coated with the syrup and the ones on top look shiny and taste a little caramelized when the tart is fully baked.

 let the tart cool completely in the pan then remove it-a warm tart will break pretty easily and the fluted shape of the crust tends to create weak spots so heed the advice and just wait.

beautiful...

for the complete recipe, see my entry on food52.coms best maple recipe contest by clicking here.  and as always, bake one and send me a photo, i will post it here!  bake on friends, bake on

Tuesday, March 20, 2012

twd: irish soda bread


every march, i make at least one batch of irish soda bread with my aunt's recipe; it is a bittersweet ritual that usually causes me to tear up at least once.  i have blogged about it before, and if you follow that link, you will see why it can bring me to tears.  baking irish soda bread is a tradition that has been part of my life-my aunt made it every year and so did an elderly neighbor.  one thing about coming from the new york city area-there are lots of irish neighborhoods and lots of irish families and plenty of soda bread to go around.  my mother (who is irish) also has a thing for soda bread and although she does not bake it, she will send me recipes for the true bread-without the raisins and caraway, because that is how they make it in ireland.  the addition of currants and caraway is an american tradition.

for this weeks challenge, we turn to hosts cathy of my culinary mission and carla of chocolate moosey and they have posted the recipe on their blogs if you would like to try baking a loaf.  better yet, buy a copy of the book or borrow it from the library and try baking along with us some time.

 this simple bread consists of 4 ingredients; flour, buttermilk, salt and baking soda.  it mixes up easily and quickly.

 a minute of kneading will give the bread just enough structure to retain its shape and rise a little.

 a simple x on top is all that it needed

 fresh from the oven-it smells heavenly and rather like a biscuit and it tasted like a buttermilk biscuit to me

 the crumb is on the small side with a few holes so that it mimics a loaf of yeasted bread

along side a loaf of american soda bread using my aunt's recipe-twice the joy!  thanks to our hosts cathy and carla for a lovely start to my week!  to see what everyone came up with, check the leave your link page on the tuesdays with dorie blogpage

Wednesday, March 7, 2012

chocolate beet bundt cake

every year starting in january, a new master gardener class begins.  each week there is at least one class on a topic related to gardening.  as a certified member, i am required to earn continuing education hours to maintain my certification;  i attend  as many of these classes as i can.  more importantly, it is helpful to attend the classes in an effort to welcome the new members and hopefully, retain them once the classes are finished.  i take that part seriously; i bribe them weekly with cake!  this weeks offering was a rich and moist chocolate bundt that also contained a secret ingredient:  beets.  

while digging through the cupboards, i came across a can of beets that had been pushed to the very back.  i ran the beets through the blender with the juice from the can to get an awesome red puree.  for those of you who prefer to use fresh or your own canned beets, you will need 1 3/4 cups of puree with the consistency of buttermilk so be sure to add the liquid you boiled/canned them in as needed.

when folded into the batter, it doesn't show-it disappears like magic.  not only that, no one and i mean NO one was able to guess what was in the cake.  then again, it was so chocolatey and moist, i doubt anyone was thinking it reminded them of beets.  so why bother?  the moisture for one and the added fiber too and then because i love hiding the vegetables in the cake...

all ready for the oven!


chocolate-beet bundt cake
1 (12 cup) bundt serving 16


1 (15 oz) can beets
4 oz bittersweet chocolate, melted
1 1/2 cup unsalted butter, softened
2 1/4 cup dark brown sugar
1 1/2 teaspoon vanilla
1/4 teaspoon salt
5 eggs
2 2/3 cup all purpose flour
1/2 cup cocoa powder, natural preferred
1 tablespoon baking soda
1/2 teaspoon cinnamon
1/4 teaspoon nutmeg
powdered sugar for dusting the top of the cake

preheat the oven to 350.  grease and flour a bundt or tube pan with a 12 cup capacity.  drain the beets and reserve the juice.  place the beets in a blender with some of the juice and blend briefly.  add the remaining juice and blend until smooth, pour into a bowl and set aside.  melt the chocolate in a microwave safe bowl on the lowest power or defrost setting using 30 second intervals.  stir until smooth and set aside.

in a large mixing bowl, cream the butter with the dark brown sugar, vanilla and salt until light and fluffy.  pour in the melted chocolate and mix well.  be sure to scrape the bowl at least once to completely combine the ingredients.  add the eggs, 1 at a time and scrape the bowl as you go.  to sift the dry ingredients, place the flour, cocoa, baking soda and spices in a large mesh strainer.  sift them over the chocolate mixture.  fold a few times, add the beets and fold until the batter is uniform in color.  

scrape the batter into the prepared pan and bake until a pick inserted comes out clean, about 1 hour and 15 minutes.  allow the cake to cool in the pan for 20 minutes and then turn it out onto a rack to cool completely.  sift powdered sugar over the top of the cooled cake. 

bake one and send me a photo!  may the power of the beet be with you...

Tuesday, March 6, 2012

twd: rugelach

 well, it's another twd/baking with julia tuesday.  this week, it's rugelach and the festivities are hosted by margaret of the urban hiker and jessica of my baking heart and by visiting their sites, you should find the recipe but i strongly suggest you buy a copy of the book instead.  i knew that this would be an easy recipe to work with-i've made rugelach by the thousands over the years.  the only thing i wasn't sure about-the lekvar filling.  when i couldn't find it in the store, i should have made my own but ran short of time and had to substitute jam.  to anyone contemplating that idea-think twice!  jam melts and runs all over the tray leaving your rugelach to simmer in a puddle of liquid fruit.  this is especially true if you use the amount called for in the recipe-so heed the warning, if you use jam, cut back on the amount, cut way back!


 this is where the work was-gathering the ingredients and preparing them for filling the rolls of dough.  i used walnuts, figs and cherries.

 the dough was so easy to work with.  i may have an advantage with that since this is the sort of stuff i do for a living and must roll large pieces of dough out by hand regularly.

 red plum jam and apricot-all fruit jam, my suggestion-make the lekvar if you can't find it in the store!

 topped with sugar and nuts

 here come the dried figs

 all rolled up-almost like they were folded in half; they were so fat and hard to roll nicely

 when cutting slices, i always mark the dough with a ruler and a knife first to make it easier and more consistent in size

 i had a lot of that sugar mix left over and i am sure it will end up in a coffee cake.

 out of the oven, you can see the puddle of jam and melted sugar in the middle

 so, i took the left over dough and made a round patty with it.  i rolled it out into a large circle and cut it into 12 wedges.

 brushed with a little melted butter, sprinkled with cinnamon sugar, walnuts and figs

 rolled into crescents

now, that's what i'm talkin about!!!

many thanks to margaret and jessica.  and to all of you, bake it and send me a photo, i will post it here.  bake on my friends, bake on...

Thursday, March 1, 2012

dinner for 1

when my husband has to travel for work, i tend to cook meatless meals-too much work for me to make an elaborate meal for just myself.  the choices i make lean towards a larger quantity than i need so that i can live on leftovers.  almost all of the meals incorporate some sort of bean or a grain other than rice since hubs makes that frequently.

with winter being so mild this year, our garden has chugged along nicely.  the crops we planted for fall are still in the beds and that has given us a chance to consume fresh picked produce a lot longer than typical for a winter garden.  we deliberately left our broccoli plants in the bed even though we had harvested the crowns.  if you allow broccoli to stay, little side shoots will produce single stalks of flower heads that are every bit as tasty and perhaps a little more tender than the large central stalk that makes up the crown.  did you know the leaves are tasty too?  they can be clipped, stemmed and cooked like collards making a wonderful addition to a meal and a pretty cheap one too-think of it as doubling the yield of a plant!

broccoli florettes and brussel sprouts from the garden are mixed with some store bought cauliflower and marinated using a recipe for cauliflower steaks from gluten free fix.  simply substitute a selection of chopped vegetables for the steaks and coat them evenly with the marinade.  then roast them until they are soft and have some color-about 30 minutes

 my idea of heaven in a bowl!

for the main course, i turned to a new acquisition, the flexitarian table by peter berley.  the hubs and i were perusing the cookbook section in 
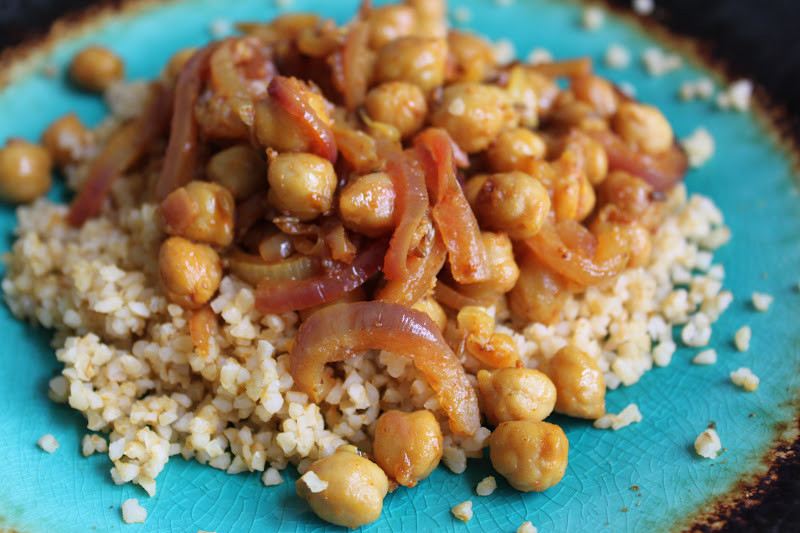
mckay's and i picked it up for $5.  the photos are beautiful and i am eager to try out several.  for my first cooking adventure, i chose the bulgur with roasted chickpeas, red onions and lemon.  it is meant to serve 4 as a main course but i planned to live on it for a couple days and i did!

i made a couple changes to the recipe.  first, when ever a recipe calls for water, especially when it is a grain, i substitute vegetable broth.  for additional flavor, i added a couple cloves of garlic.  since i am not a huge fan of cayenne pepper, i substituted some ground chili.  lastly, i chose to keep the bulgur and the chickpeas separate.

bulgur with roasted chickpeas, red onions and lemon
serves 4
1 1/3 cups vegetable broth
1 cup medium bulgur
2 tablespoons olive oil
1 medium red onion, thinly sliced
2 cloves garlic, minced
1 (15 ounce) can chickpeas, rinsed and drained
2 tablespoons freshly squeezed lemon juice
2 bay leaves
1 teaspoon cumin seeds
1/2 teaspoon ground turmeric
1/2 teaspoon sweet paprika
1/8 teaspoon ground chili or cayenne

to cook the bulgur, heat the broth to a boil  over medium heat in a covered sauce pot.  add the bulgur to the boiling broth and stir it in.  return to the boil then immediately remove from the heat, cover tightly and allow it to sit until the broth is absorbed, about 20 minutes.  meanwhile, prepare the chickpeas and vegetables.

preheat the oven to 400.  in an oven proof skillet-i used a cast iron skillet, heat the olive oil and sauté the onions and garlic until translucent, about 3-5 minutes.  add the chickpeas, lemon juice, bay leaves, cumin seeds, turmeric and chili and stir to combine.  place in the oven and roast until slightly caramelized, about 20 minutes.  be sure to stir it at least once to get an even color.   serve over the bulgur with a heaping side of the roasted veggies shown above.

and as always my friends, if you make this dish, do send a photo, i will post it here!  in the mean time, bake on...