Friday, August 30, 2013

cooking the books: szechuan green beans and shrimp fried rice

i am a cookbook hoarder.  i'm not ashamed, it's a habit that i can live with and speak of out loud without fear of the consequences.  after all, i am a cookbook author, it's only fair that i collect the books of other authors if i expect anyone to collect mine.  my husband might disagree, he suggests getting rid of the ones i do not use on a regular basis.  i have become adept at getting around this.  my current strategy is to cook from the books that have gathered a little dust.  he is enjoying the results and asks when i will make something again, also asks "what did you cook for dinner today?" with a level of enthusiasm i am not accustomed to.  so you see, my plan is working, for now at least because men can easily be manipulated with food, sometimes.

long, long ago, before children, i bought a copy of irene kuo's book, the key to chinese cooking.  it was published in 1977 and i have had it since the 80's when i purchased it most likely from a book club-remember those?  oh how i have dated myself with this post...  this book has been lugged around, cross country twice and recently, i decided i needed to use it or lose it.  

while i have always enjoyed chinese food, it is not something i crave.  but i must admit, i have always loved the stir fries served in restaurants.  the texture of meat and poultry is always so tender and moist.  the secret is the velveting technique and using the recipe in this book works.  to test the theory, i made my husband cook a chicken stir fry using the recipe-after all, he was the one who said you have to velvet the meat to make it tender.  he is fussy about meals so when i see him getting cranky about food-i make him cook it.  but to be fair, i try to make meals that he will enjoy.  and recently, i picked up this book and made him a batch of szechuan green beans and shrimp fried rice.  the garden dumped a bowl of beans on me and it was the perfect recipe to use them in.

between our garden and the demonstration garden i work in, i had several types of beans to work with.  from the left; pole beans, royal purple beans, blue lake bush beans, haricot verts and asparagus long beans wrap around the bunch.  i cut them all to the size of the verts to make cooking them easier.

the first and most important step, deep frying them.  the purple beans lose the color and go green pretty quickly.  after frying them, the beans are set aside.  the remaining ingredients are quickly stir fried and the beans added to the mixture at the end.

i could eat these all day.  

the recipe calls for hot bean paste, something i did not have.  my solution was to add a small piece of finely diced cowhorn pepper.  it added more than enough heat!  the recipe also called for ground pork or beef and i opted to omit that completely-the dish was flavorful and filling without it.

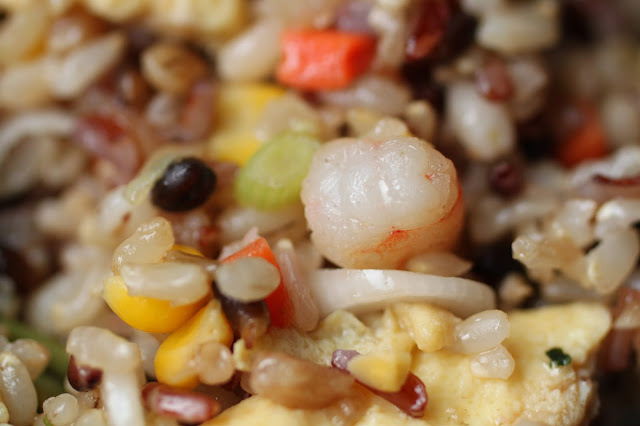
to complete the meal, i used ms. kuo's recipe for shrimp fried rice.  it calls for cooked rice which is a great way to use leftover rice but who keeps 3 1/2 cups of cooked rice in the fridge?  not me!  so i cheated and used a multi-grain rice from trader joe's.  it is a frozen-cooked product but i know it will be better than anything i could have cooked on short notice.  i need to work on my rice cooking skills. for the purists, it takes about 1 up raw rice to make the needed 3 1/2 cups cooked rice.  and just to make it interesting, i added a few veggies for color; carrots and corn were what i a had available.

szechuan green beans and shrimp fried rice
both recipes are adapted from the key to chinese cooking by irene kuo

green beans
1 pound green beans, cleaned and cut in half
1 teaspoon minced ginger
1 scallion, finely chopped
1 clove garlic, minced
1 tablespoon minced cowhorn or other spicy pepper(can be omitted or reduced)
1 teaspoon sugar
1 tablespoon soy sauce

1 tablespoon dry sherry
2 cups vegetable oil
1/4 cup vegetable broth
1 teaspoon vinegar-cider or rice
1 teaspoon sesame oil
sesame seeds for sprinkling on top

the book uses a technique of preparing a working platter and it is very helpful so i will use it here as well.  place the beans on the platter.  as you prepare the ginger, scallion, garlic and hot pepper,  place them in separate piles on the platter.  in a small bowl, stir together the sugar, soy sauce and sherry and set it aside.  have a heat proof bowl with a strainer ready for the beans.  using a wok, heat the oil to 375.  add the beans slowly by scattering them across the surface of the oil a few at a time to keep the temp from dropping quickly.  stir them constantly to fry them until they look wrinkly, about 3 minutes.  dump the beans and oil into the strainer.  save the oil, you will need 2 tablespoons for the rest of the recipe, keep the remaining oil in the fridge and use it anytime you need oil for a savory dish.

over medium heat add the 2 tablespoons of saved oil to the wok and swirl it around to coat the surface.  add the ginger, garlic, scallion and pepper and stir a few times.  add the sauce, broth and the beans and quickly toss it to coat the beans.  finally, add the vinegar and sesame oil, stir a few times and dump out onto a serving dish and finish it with a sprinkle of sesame seeds.

shrimp fried rice
4 ounces raw shrimp-weight is without the shells, only the meat
1/4 teaspoon salt
1 teaspoon cornstarch dissolved in 2 teaspoons water
5 tablespoons oil (remember the oil you saved from the beans?)
2 large eggs
3 1/2 cups cooked rice
2 large scallions, chopped finely
1/2 cup cooked vegetables-frozen and thawed veggies will work here, i used corn and carrots
soy sauce and sesame oil to taste

if the shrimp are large, chop them into 1/2 inch pieces.  toss them in the cornstarch/water mixture.  heat the wok over medium-high heat and add 2 tablespoons of oil.  swirl it to coat the wok, turn the heat to medium and scatter in the shrimp.  stir them quickly to cook them and then dump them into a dish and set aside.

wipe out the wok, heat it again over medium-high heat and add the remaining 3 tablespoons of oil.  again, swirl the oil to coat the wok and heat the oil.  add the eggs.  as they cook around the edges, push them to one side of the wok to allow the still liquid eggs to run into the oil and cook.  tilt the pan if needed and continue to do this until the eggs are no longer runny but are soft and fluffy-almost like an omelet.  scrape them out into a dish and set aside.

reheat the wok over medium heat, no more oil is needed at this point.  add the rice and stir it to heat it, about 1 minute.  add the scallions and cooked veggies and stir rapidly to heat them.  add the shrimp and the eggs and using your spatula (bamboo works well here-it will not melt!), fold the sides into the middle to mix it and to chop the eggs.  drizzle in a little soy and sesame and stir to combine, pour into a serving dish.  

Wednesday, August 28, 2013

carrot-ginger dressing

back in june, i attended a food styling workshop hosted by the nashville food bloggers.  it was not only a fun way to spend a saturday morning, it was very informative.  we learned how to style a salad.  sounds easy doesn't it?  well, while it isn't rocket science, it is complicated in that you have to arrange things just right or it doesn't look appetizing and won't photograph well.

the class was led by teresa blackburn and she showed us two techniques.  first, how to plate an actual salad and all of the components in it and then how to tell the same story with just a forkful of food.  my photos below will tell my story.

when we go out to japanese restaurants, my favorite dish always ends up being the salad served while waiting for sushi to arrive.  more than once, our daughters, and sometimes my husband too,  have passed their bowls to me.  weird, isn't it?  what could be so wonderful about iceberg lettuce covered in pureed carrots?  well, for me, it's the dressing.  there has always been something about that dressing for me.  it must be the combination of fresh, raw carrots with ginger and soy sauce, some of my favorite flavors.  recently, i found a recipe for carrot-ginger dressing from saveur magazine.  after making a few subtle changes, our own honey for the sugar and a little sesame oil, i had more than a pint of dressing to  keep me fed for the next week!  then i realized it was a chance to try and photograph a salad using my newly acquired skills.
for the actual bowl of salad, i attempted to use props with an asian flair to them.  i carefully arranged the salad but left it undressed.  next i staged the shot, set up the bounce card on a tripod, put the camera on another tripod and began taking test shots.  finally, i dressed the salad and took some shots.  meh...so disappointing.  i fussed and futzed and so on and so forth.  nothing.  no matter what, it just looked blah.  the lighting was not very interesting either.  it was late afternoon heading to early evening and the light was bordering on harsh.  i almost gave up completely but then had a thought; what if i broke it down and told the story of the salad with just a forkful of food?

it was if the stars suddenly aligned.  the lighting changed and it made the tomatoes and the dressing glow.  the shot isn't perfect, but i didn't expect perfection-just a chance to practice the skill.  and of course, to eat a small boatload of salad with carrot-ginger dressing.

saveur carrot-ginger dressing
makes about 4 cups dressing

1 cup vegetable oil-i poured 2 tablespoons sesame oil into the measuring cup and then filled it with canola oil
1/2 cup rice vinegar
1/4 cup soy sauce
1 tablespoons sugar-i used wildflower honey from our bees
1 1/2 teaspoon freshly grated ginger
8 ounces carrots, raw-peeled and chopped into pieces
6 ounces onions, diced

the directions call for processing all of the ingredients in a food processor until smooth.  i did this but my food processor left it too chunky for me, i dumped it in the blender and blended it until smooth.  season with salt and pepper if desired.  serve over wedges of iceberg lettuce.  

Monday, August 26, 2013

a cake with tomatoes? absolutely!


you are not imagining this-i really am suggesting that you make a cake with tomatoes.  a spicy, moist cake studded with currants and pecans that is perfect for the extra tomatoes your garden is dumping on you hourly.  it is also good in late winter when dreams of a summer garden are all you have to keep you going in dreary weather.  honestly, it is good anytime; when isn't a bundt cake a good thing?  never, if you ask me.

it does not matter what type of tomatoes you use for this recipe.  they can be yellow, pink or red, even green.  what is important is that they taste good to you.  sweeter varieties will probably add a little to the sugar content of the cake but the tomato flavor really isn't detected in the final product.  the only exception might be that the redder varieties could give the cake a more golden-orange hue.  i haven't tried it with green tomatoes but i am thinking that the color may not be as pretty as the cake in my photos-i used deep red beefsteak tomatoes.

one final note, you can use your own homemade puree or if you do not have flavorful tomatoes to make puree, use tomato juice or canned whole or crushed tomatoes.  be sure to run them through the food processor to eliminate the chunks and be careful of using a brand with flavors added; no one wants garlic or onion in their cake.  

the tomatoes will need to be peeled first.  you could simply run them through a food mill to do this or mark an "x" on the bottom of the tomato with a paring knife and then lower the tomatoes into rapidly boiling water.  after 45 seconds to a minute, remove the tomato and check it by pulling at the skin where you cut it.  if it peels up easily, they are ready.  if not, put them back in the water for another 15 seconds and repeat the test.

the skin will peel off easily when they are blanched properly.  

cut the tomatoes in half, remove as much of the jelly and seeds as you can, roughly dice them and put them into the food processor.  pulse them to form a puree that has no detectable chunks of tomato.


so easy to make!  this is one of my favorite bundts.  

to see the recipe, visit my page on food52.com by clicking on this link.

go ahead, bake one, i dare you.  then send me a photo, i will post it here along with mine!

Saturday, August 24, 2013

ice box cake with homemade wafers and caramel cream

some time ago, while walking through midtown manhattan with a friend, we passed by magnolia bakery.  in the front window of the shop, a cake decorator was assembling icebox cakes, something they are famous for.  she made it look so easy.  i wanted to make one at home to take to a pot luck dinner.  honestly, i was too lazy to go to the store(s) to look for the chocolate wafers; i made my own.
the recipe i used is from my second book and is the cookie used to make chocolate short stacks, a series of cookies and chocolate whipped cream that is stacked and layered with raspberries.  the cookies are easy to make, i made mine in the food processor.

when i roll out cookies, i use wooden dowels to keep the dough thickness consistent.

they bake up crispy but that changes when they sit with the cream.

to make the cream part, i used some homemade caramel sauce and whipped cream.  the tough part is not to over whip it but to leave it a little glossy so that it spreads smoothly.  also important, use a 40% cream that is not ultra pasteurized since that will have the best texture.

all dressed up and ready to go.  another hint, work quickly, whipped cream does not like to sit out on a hot summer day-it gets a rough texture, just look at the top of the cake.  not a problem for the group i served it to, all i got back was a dirty plate...


caramel icebox cake
serves about 12-16

chocolate wafers
2 cups unbleached all-purpose flour
1 1/3 cups confectioners’ sugar
2/3 cup unsweetened cocoa powder
1/2 teaspoon ground cinnamon
2 sticks (8 ounces) cold unsalted butter, cut into cubes
2 teaspoon vanilla extract
coarse sugar

preheat the oven to 350 F. line 3-4 baking sheets with parchment paper or silicone liners.

place the flour, confectioners’ sugar, cocoa powder, and cinnamon in the bowl of a food processor and pulse to blend. sprinkle the butter cubes over the mixture and pulse to cut it in. add the vanilla and process just until a smooth dough forms.  add a teaspoon or two of water if the dough does not seem moist-it should be soft and pliable but not crumbly.

remove the dough from the machine and form into 2 thick disks. on a lightly-floured surface, roll out each disk about 3/8 inch thick. using a 2 1/2-inch round cutter, cut out at least 60 circles. rework the scraps once or twice and roll out a couple extra. place the wafers about 1 inch apart on the prepared pans. prick them a few times with a fork and sprinkle the tops with the coarse sugar.

bake for about 12 minutes, rotating the pans after 6 minutes, until crisp. let set on the sheet for 5 to 10 minutes, then transfer to a wire rack to cool completely before using.

caramel cream
4 cups heavy whipping cream, preferably 40% fat and NOT ultrapasteurized
1/2 cup good quality caramel sauce or dulce de leche

mix the ingredients in a bowl and whisk lightly to melt the caramel.  on medium speed, whip until almost stiff peaks form, it should be a little glossy.  assemble the cake and allow it to sit for at least 4 hours before serving.

to assemble the cake
make a ring of 6 cookies on a serving plate, place one in the center.  dollop about 1/2 cup of the cream on top of the ring and carefully spread it out to the edge of the cake but do not let it go over the side.  in the spaces between the cookies, position another ring of cookies around the layer of cream and also place one in the center.  again, top the layer with a 1/2 cup dollop of cream and spread it to the edge.  repeat this with the remaining cookies, alternating the placement of the cookies so that each layer is placed in the spaces between the cookies of the previous layer, you should have 9 cookie layers.  use the remaining cream to make a generous layer on top.  decorate with a couple crumbled cookies or some chocolate shavings.  refrigerate for at least 4 hours before serving.


Thursday, August 22, 2013

food styling, kinda-sorta: apple and strawberry-rhubarb pies for a magazine

ever wonder just what the person behind the food blog does in real life?  we read the blog, follow them, use the recipes and even communicate with them, call them "friends" but do we really know them?  not really, and that's okay.  so many food bloggers are simply talented home cooks/bakers while others are professionals in the kitchen.  myself, i fall into the latter category; i am a pastry chef and cookbook author.  

for years now, i have heard people ooh and aah when i tell them that i am a pastry chef.  it's as if it is something so fantastic and magical and oh how they wish they could be one too.  if i only had a dollar for every time someone said, "oh that must be so much fun!"  really, fun?  it can be on occasion.  most of the time, it is hard work, physically draining and a bit stressful.  even so, i still have fun and most of all, i love doing what i do and could not imagine holding down any other type of job.  

every now and then, i have the opportunity to do something exciting on the job.  remember back in february when my coworkers and i went to the james beard house in new york city?  i am still in awe.  there have been photo shoots and video segments and all sorts of exciting events.  one such event was a recent photo shoot for a big magazine, i won't name it now-but i will when it hits the stands.  there was a country music star in the photos too but, i was just happy for the chance to make a few pies for a national magazine.
for the shoot, they chose apple and strawberry-rhubarb pies, six of each.

apple pies getting ready to go into the oven

and in the blink of an eye, they are ready!

so are the strawberry-rhubarb pies

i can almost smell them-can you?

probably my two favorite fruit pies, apple and strawberry-rhubarb.  yup, this is the sort of day i would call fun.  the sort of day that makes getting up at 2:40am worth the lack of sleep.  the sort of day that makes working on your day off just fine.  it's true, i live to bake, absolutely love to bake, so there.

Tuesday, August 20, 2013

raspberry-fig crostata: a tuesdays with dorie recipe


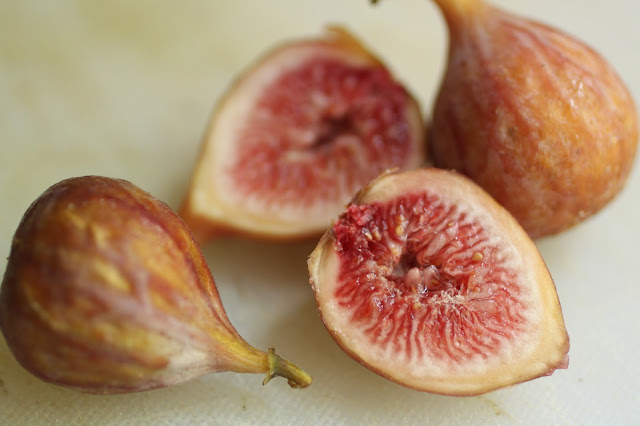
it's fig season and our tree is loaded with ripening fruit.  we have two trees actually, a brown turkey and a celeste.  the figs above are from the brown turkey tree; the celeste tree is not producing much fruit yet.  we have been picking the little fruits by the dozen and when i learned this weeks challenge was a choice between a johnny cake cobbler and a raspberry-fig crostata, i had to make the crostata since i had plenty of figs.

we are currently posting without a host but there is a website with some of the recipes on it and the crostata is one of them, see it here.  luckily, there is another link in the recipe to the dough.  but if i may climb on my soapbox for a moment, please consider buying a copy of the book.  as a published author, i cannot tell you how much it means to have the book you worked on sell.  if you cannot buy it, at least try to borrow it from a library or a friend.

i have a collection of tart pans.  for this recipe, i chose the smaller, deep pan which is about 8 inches in diameter.  my thinking was that it would have a nicer ratio of fruit to crust in the deeper pan.

a few notes about the dough, it is a bit sticky and crumbly.  it does not hold itself together well when moving it so be prepared to do some patchwork.  since it was so rich with sugar and eggs, i skipped the egg washing step.  and since i used the smaller pan, i needed a lot less dough-i have about a third of it left.  do not worry, i plan to make some linzer cookies with it.

when it came out of the oven, it was nice and sparkly despite the lack of a wash on top.

beautiful

it was late when i finally pulled the tart out of the oven so we waited until the next day to dig in.  it help up nicely but honestly, the fruit filling could have used more flour.  if i make this again, i will definitely double the flour.
love the color of the filling!  come bake with us sometime.  to see the other participants results, visit the tuesdays with dorie page.

Saturday, August 17, 2013

biscuits and jam; a southern tradition


baking a cake to take to the garden each sunday morning can get a little boring.  every now and then, i make something different.  soda bread, scones, muffins, whatever; anything but a cake will be fine for those days.  when the blackberries in the garden were at their peak, i picked six pounds in one morning.  after taking them home, i cooked up a batch of blackberry jam.  fresh jam meant i would need biscuits, lots of biscuits to take to the garden in the morning.

biscuits have always been a favorite of mine, specifically yankee biscuits.  crispy and flaky on top, they practically beg you to slather them with butter.  yankee biscuits are made by cutting cold butter or shortening into the flour and baking powder.  keep in mind that the flour is not self rising, you would be hard pressed to find it up north.  the dough is patted out so that it is at least as thick as your fingers and then cut.  when they bake, they rise up and the flaky layers almost looked stacked on top of each other.

cut the butter into cubes and keep it chilled until needed.  cold fat is not as likely to smear or melt into the dough during mixing and shaping.  lots of little lumps of butter mean lots of flaky layers after they are baked.

the dough is easy to make and does not require much equipment.  an old fashioned pastry blender is perfect for getting the butter cut to the size of small peas.

pat it out, don't roll it out.  the less your dough gets worked, the more tender and flaky it is.  judge the thickness by laying your fingers next to the dough; it should be at least as thick as your fingers for tall biscuits.

everything i used to make biscuits-no special equipment needed!

almost ready for the oven

a little brush of butter and in they go

hot out of the oven!

buttermilk biscuits
makes about 16-2 1/2 inch biscuits

3 1/2 cups unbleached all purpose flour
4 teaspoons baking powder
1 teaspoon baking soda
1 teaspoon salt
10 tablespoons unsalted butter, cold and cut into cubes (plus more for brushing)
1 1/2 cups buttermilk

preheat the oven to 425.  line a baking pan with parchment paper and set aside.  place the flour, baking powder, baking soda and salt into a shallow bowl with a flat bottom and stir to combine.  sprinkle the butter cubes over the top of the flour and using a pastry blender, two knives(or forks) or your fingers, cut the butter into the dry ingredients until it is a little smaller than peas.  pour the buttermilk over the mixture and stir until it comes together.  place the dough on a well floured work space and knead it a few times to make it more manageable-use plenty of flour to prevent sticking.  gently pat the flour out until it is as thick as your fingers or a little thicker and cut with a round cutter.  place the biscuits on the prepared pan, brush with a little melted butter and bake until golden brown, about 12 minutes.  serve immediately.

we enjoyed these immensely with a lot of soft butter and fresh blackberry jam.  

Friday, August 16, 2013

blueberry muffin cake and welding; a perfect saturday morning

now that the kids have ditched us, i have found myself looking for new things to do.  sure, i spend lots of time in the garden but when my husband is working late-and that happens frequently, i need something to keep me busy.  the perfect solution has been to take classes at watkins college of art, design and film.  they have a fantastic community education program and i have taken several classes there and am signed up to take several more.

in the spring, i looked through the class schedule and saw a workshop on welding.  it was strictly for beginners and it sounded like a lot of fun.  my friend shirley, who is also a master gardener, was quick in agreeing to attend the class with me.  girls and power tools; a perfect match.

we learned how to weld using oxyacetylene, mig and arc methods.  above, the method being used is oxyacetylene which is why they are not wearing the shields on their faces.

 oxyacetylene welding is easy to do and it was a lot of fun.  i could easily see myself doing this again.

 this was my favorite piece of equipment!  it is a throatless shear, which cuts sheet metal-sort of a big paper cutter on steroids.  to make my project, i cut each piece using this simple machine.

 this was the other fun part; curving the metal with rollers.  shirley is putting part of her project through the rollers to curve them.  i also curved a lot of my project with that roller.

and my finished project.  when i told everyone i was making a flower, they looked at me a little funny.  they looked at my skimpy little curvy pieces and told me, "sure you are making a flower, sure you are..."  they were all a little shocked when i finished it and it looked like a flower!  after a couple more coats of clear finish, it will live out in the garden.

and as always, if i go to the garden, i bring cake.  yes, i know this was a college, not a garden.  but shirley and i went to this class with the idea that we could learn a skill that might be useful for gardening.  gardening with sculpture, that is.

this cake is a bit of a mash up.  halfway to vegan, there are no eggs and several ingredients could be replaced to make it vegan if you like-or throw caution to the wind and make it ovo-lacto.

blueberry muffin cake
1 (10") bundt cake serving 12-16

ener-g egg replacer for 3 eggs (or 3 large eggs)
2/3 cup butter (or coconut oil or any combination of the two)
2 cups sugar
1/2 teaspoon salt
3 cups unbleached all purpose flour
1 tablespoon baking powder
1 1/2 cup fresh blueberries
1 cup buttermilk (or a nondairy milk such as coconut or soy)


preheat the oven to 350.  grease and flour the pan and set it aside.  if you are using the egg replacer, mix it according to the directions and while it sits, cream the butter with the sugar and salt until it is fluffy.  add the egg replacer and mix it just to combine.  place the flour and baking powder into a sifter or mesh strainer and sift it over the batter in the bowl.  pour in the blueberries and fold the mixture a few times to coat the berries.  add the buttermilk and fold completely until no streaks of flour or butter are visible.  scrape the batter into the prepared pan and bake until a cake tester comes out clean when inserted into the deepest part of the cake, about 1 hour.  allow the cake to cool on a rack for 20 minutes.  turn the cake out onto the rack and allow it to completely cool-if you can...

Monday, August 12, 2013

gardening for cake: zucchini-carrot bundt cake

sometimes, you have to resort to bribery.  to attract volunteers to the demonstration garden, we tell perspective volunteers that there will be cake to snack on.  we also tell them that there are plants and produce to share but the cake seems to get their attention quicker.  but baking a cake every week means that i have to find a recipe and secure the ingredients.  every now and then, someone comes out to the garden with a dietary issue that can make it especially challenging.  we recently had a few volunteers who followed a vegan diet and that makes baking cakes a real challenge.

believe it or not, butter adds moisture and flavor to cakes as well as texture from the fat.  eggs strengthen the structure and help add volume by holding the air that is mixed in during the baking process.  milk and buttermilk add flavor as well as moisture-try substituting water sometime, you will taste the difference.  let's not forget, a true vegan diet also means no honey since the harvesting process kills bees and honey adds moisture, helps retain moisture with its hygroscopic nature and honestly, it tastes really good in a cake!  when you have to eliminate these items, it can make baking a good cake difficult, even for a pro.
with the garden in full swing now, there are so many possibilities.  berries, figs, peaches, carrots, summer squash and let's not forget an abundance of herbs to choose from.  in my own garden, i had a few zucchini and some carrots to harvest and they both work well in cakes.  since this is a vegan recipe, i had to make a few changes to the original recipe.  the current darling of the diet world is coconut.  this recipe utilizes both coconut oil and an unsweetened coconut milk beverage rather than the traditional kind in the can.  to find these ingredients, check the natural food section of the grocery store.  the oil is sold in jars and is semi solid at room temperature.  the coconut milk beverage is packed in quart sized cartons and is sold alongside soy and rice milk.  substituting the eggs is tricky.  to get a nice texture with a small crumb, i find that ener-g egg replacer works the best and this can also be found in the same section of the store.

and for those of you that are not interested in baking a vegan cake, this recipe can be quickly converted.  substitute and equal amount of butter for the coconut oil, buttermilk for the coconut beverage and 3 large eggs rather than the equivalent amount of egg replacer.

vegan zucchini-carrot bundt cake
makes 1 bundt cake serving 10-12

1 medium to large carrot
1 zucchini
1/3 cup pecan pieces
4 1/2 teaspoons ener-g egg replacer (or 3 large eggs)
2/3 cup coconut oil (or 10 tablespoons unsalted butter, soft)
2 cups light brown sugar
1/2 teaspoon salt
3 cups all purpose flour
1 tablespoon baking powder
1 tablespoon pumpkin pie spice
1 cup unsweetened coconut milk beverage (or 1 cup buttermilk)

preheat the oven to 350.  grease and flour a bundt pan and set aside.  grate enough carrot and zucchini to measure 2 cups.  place the pecans on a baking tray and toast until fragrant, about 5 minutes.  let them cool before using.  whisk the egg replacer into 3 tablespoons warm water and allow it to sit while you begin mixing the batter.

cream the coconut oil with the brown sugar and the salt.  the oil will liquefy as it mixes so it is not necessary to mix for more than a couple minutes.  add the egg replacer and mix well, scrape the bowl too.  sift the flour, baking powder and spice blend over the batter.  fold it in a few times.  sprinkle the coconut beverage over the top of the batter and fold together.  sprinkle the zucchini and carrots over the top and fold together completely.  scrape it into the prepared pan.  bake the cake until a cake tester comes out clean, about an hour.  allow the cake to cool in the pan for 15-20 minutes and then turn it out onto a rack to cool completely.